If you are reading this blog post, I hope you have already decided about your blog’s niche and you are ready to set up your WordPress blog.
This blog post contains step by step instructions on setting up a self hosted blog on WordPress.org, all by yourself.
By reading this blog post, you will learn the following.
- How to set up a hosting plan and domain for your blog?
- How to install WordPress on your blog?
- How to install a WordPress theme?
- How to install plugins on your wordpress blog?
- How to publish content on your blog?
Things you need to set up a WordPress blog
In this blog post, we are discussing about setting up a blog on WordPress.org which is a self hosted content management system.
For that, we require three things to get started, a domain name, hosting plan and a WordPress theme. Don’t worry if you are new to these terms, I have explained all of them in detail below.
I would recommend buying a hosting plan from Bluehost.com which is really economical and comes with a free domain name. This set up would be much easier for beginners as your domain and hosting are offered by the same provider.
And the ideal WordPress theme for a beginner blogger would be ContentBerg from Themeforest. Because this is a theme totally designed for bloggers and within a few clicks you can set up a good looking blog, all by yourself.
Now, let’s look at the different steps of setting up a WordPress blog.
Step 1: Get a domain name & hosting plan for your WordPress blog
Getting a domain name and hosting plan is the first step in setting up your WordPress blog.
In this blog post, we will discuss how to get a domain name and hosting plan from Bluehost.com which is a WordPress recommended hosting provider.
To start with, go to Bluehost.com, and from their homepage, you can click on the ‘get started’ button.
It will take you to a section where you can see their various hosting plans.
Choose the plan for ‘Blog & Portfolio’. (See the below image)

If it takes you to another page, choose the basic plan that is priced at $3.95 per month. (See image below)
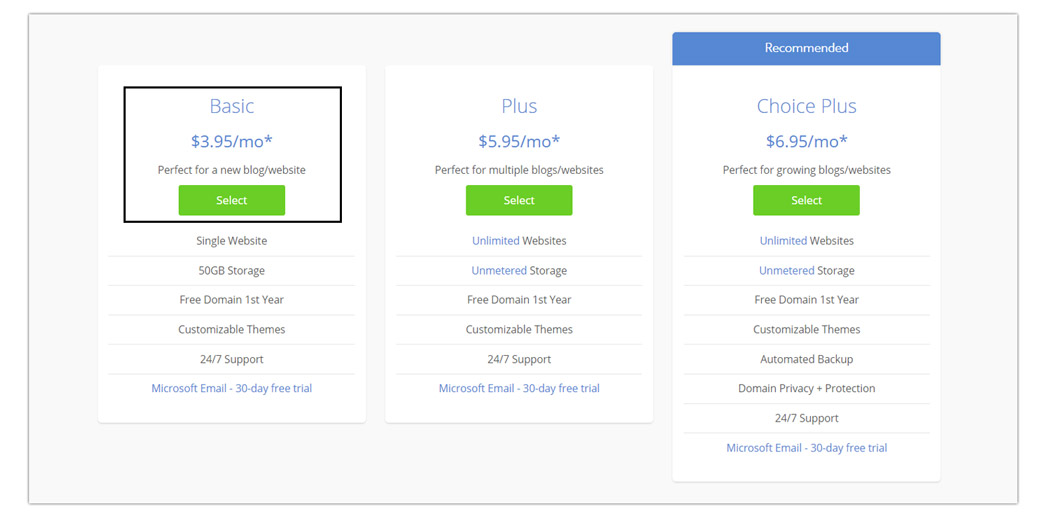
As a beginner, this is the only plan you need for now. It will help you get started at a very economical price with all the essential features.
If you have selected the basic plan at $3.95 per month, you will be redirected to a page where you need to choose your domain name options.
You can go ahead and get the free domain name that comes with the hosting plan or enter your existing domain name that you have purchased from elsewhere. (See below image)
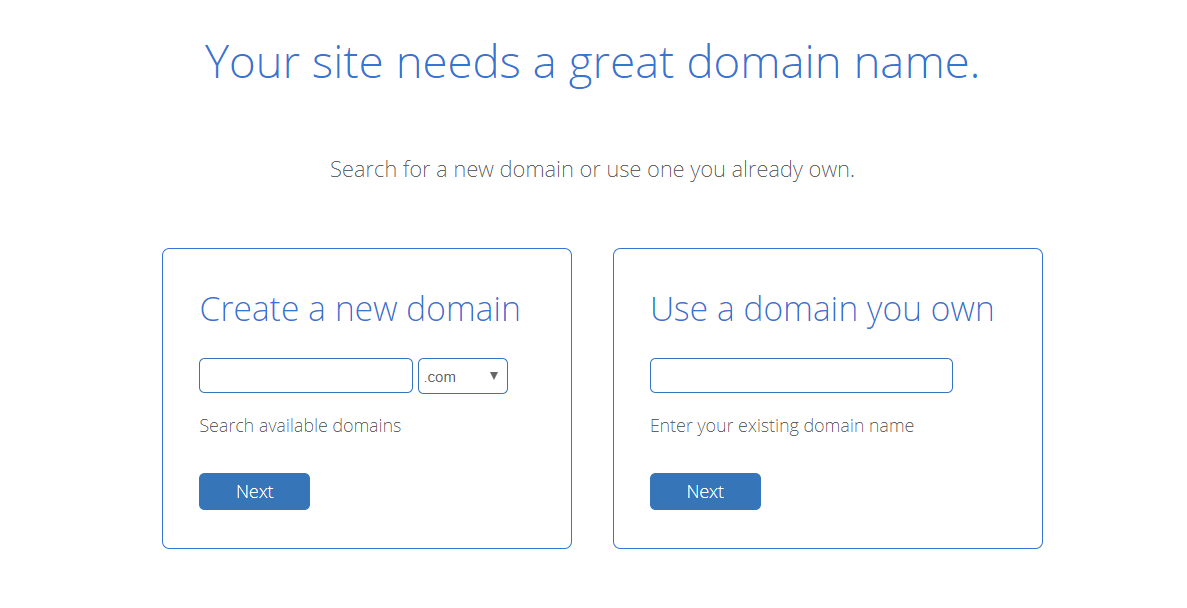
If you are a beginner, I recommend getting the domain name from Bluehost itself, as it will be much easier for you to set up and get started.
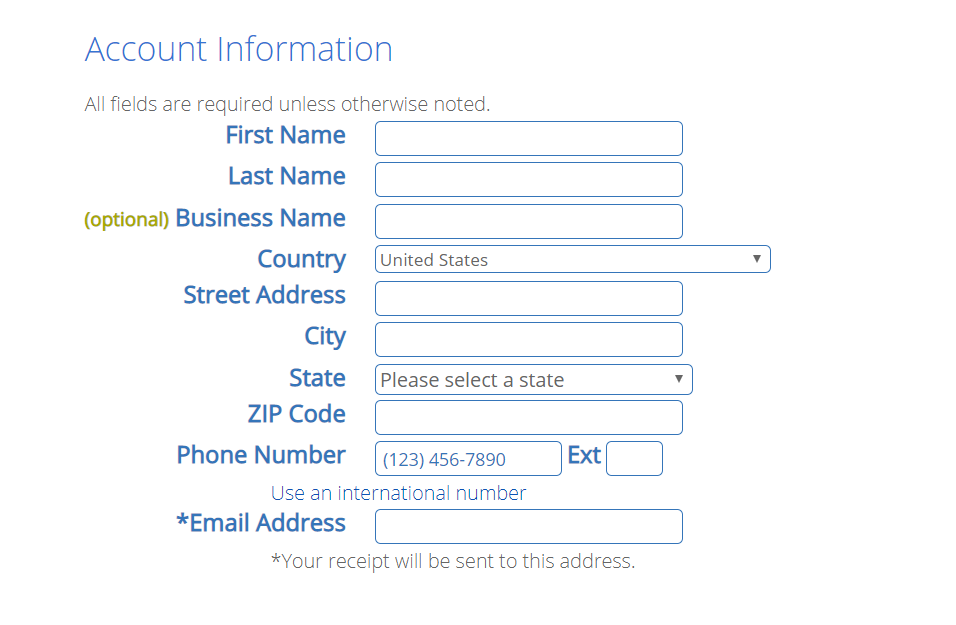
So, once you choose one of the above options, you will be redirected to another page where you need to fill in your contact information and choose the hosting plan specifications.
The first thing that you need to fill in is your contact information. (see below image)
After which you will be asked to choose your hosting plan details. (see below image)
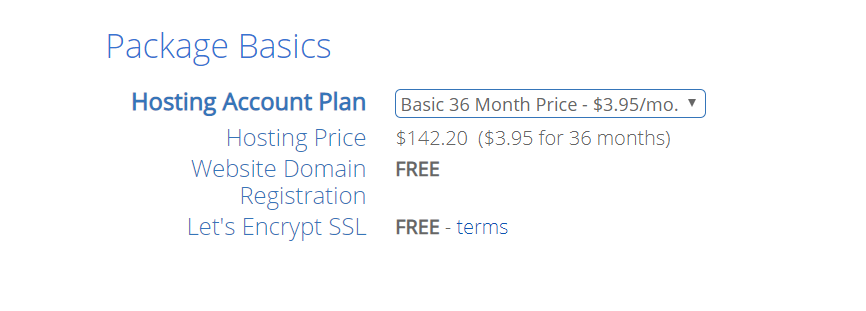
You can get the $3.95 per month offer if you purchase their hosting plan for 3 years. That will add up to $142.20 for 3 years, which is a really good price for such a long period.
This plan also comes with a free domain name for one year and a free SSL certificate.
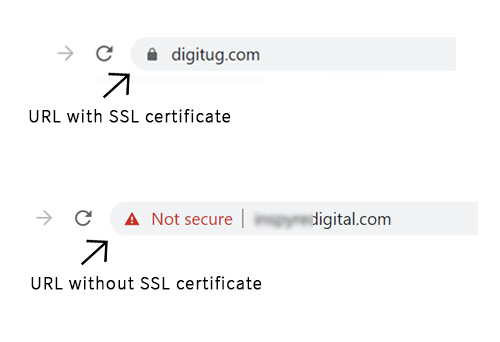
The SSL certificate will turn your blog’s URL from http to https, which is an important requirement today. Browsers like Google Chrome will mark websites without an SSL certificate as ‘unsafe’. (see below image)
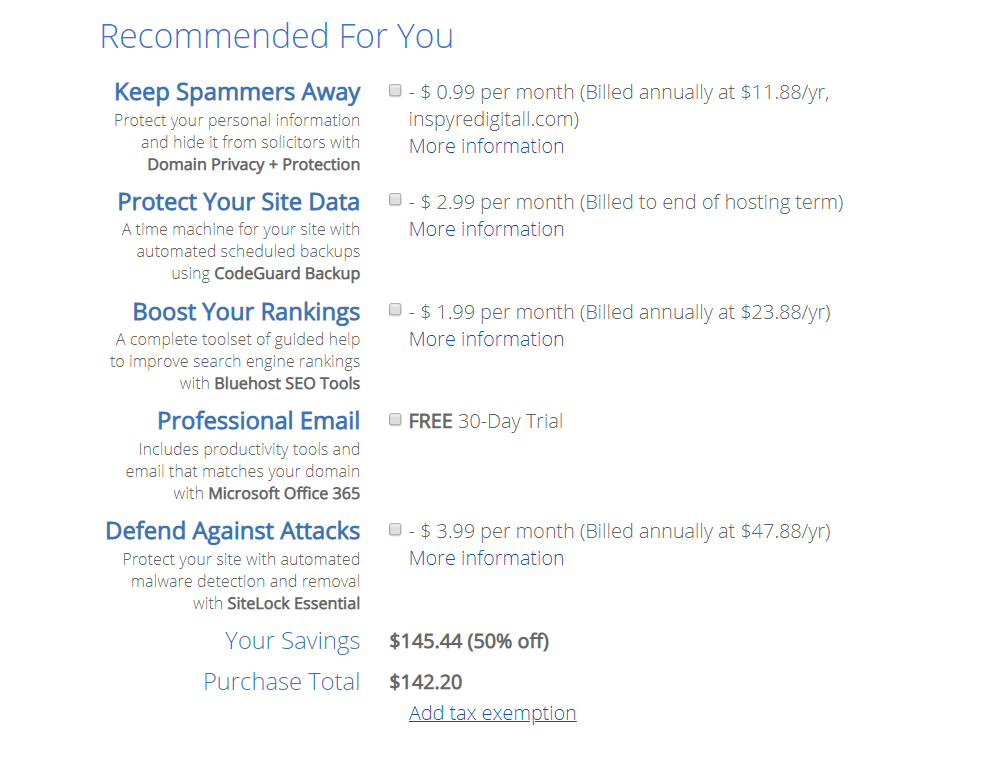
Bluehost also offers a few additional features which are totally optional. I would recommend getting the privacy protection feature (the one named ‘Keep Spammers Away’) if you don’t want others to find out the contact information associated with your hosting account. (see below image)
But, if you feel that is okay, you can directly go to the next step where you can make the payment and start setting up your blog.
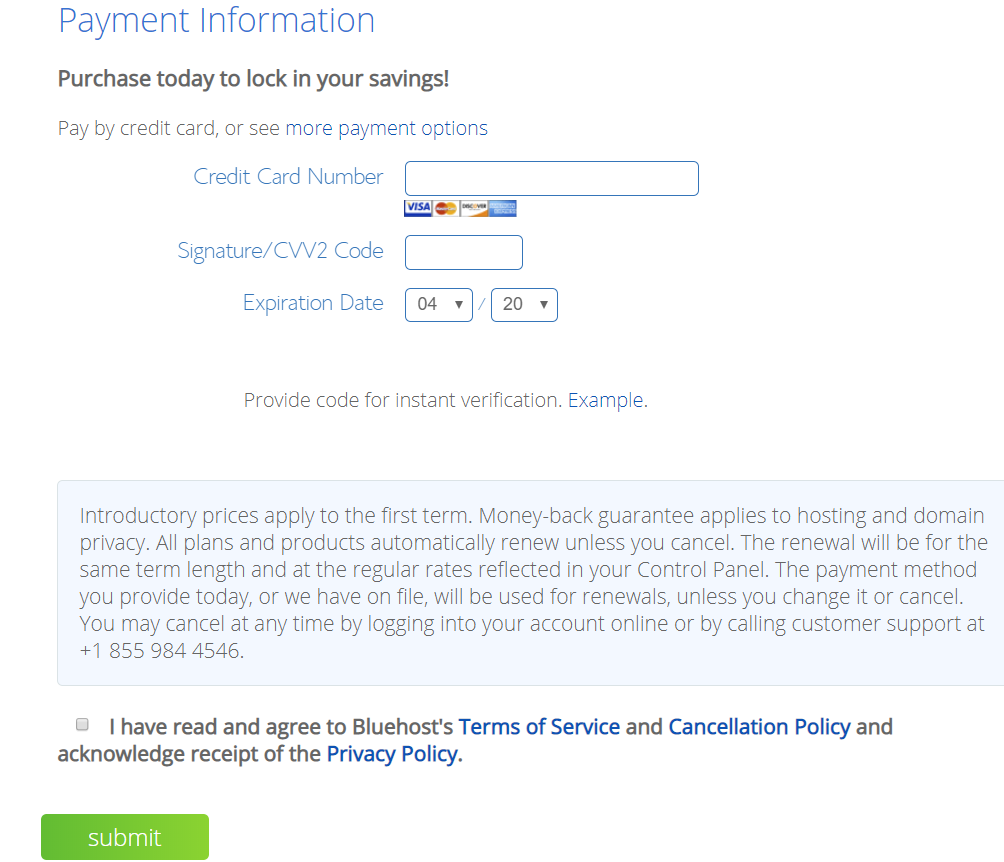
In this step, you need to enter your credit card number and other details, agree to the terms and finally click submit. (see image below)
Now that you have a hosting plan and domain name ready, and in the next step, you will need to create a password for your hosting account. Enter a strong password and note it down somewhere safely, as you will require it later to login to your hosting account.
So, we are done with getting a domain name and hosting plan for your WordPress blog.
Step 2: Install WordPress on your blog
Your blog will be running on a WordPress content management system.
To make it work, you need to install WordPress to your blog’s URL.
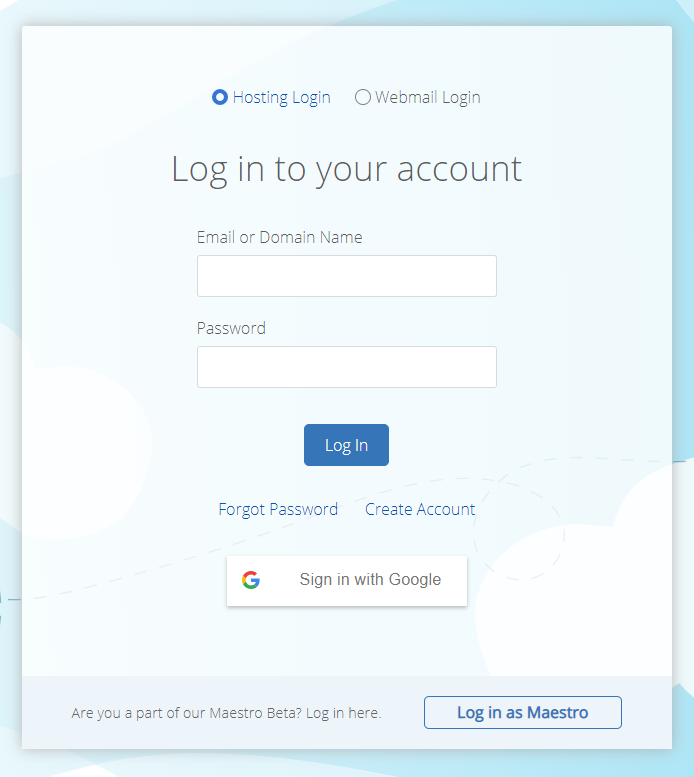
To do that, login to your Bluehost cPanel account. (see below image)
You can find the ‘website’ section and choose ‘install WordPress’.
Click on the ‘install’ button and choose the domain name on which WordPress needs to be installed. (see below images)

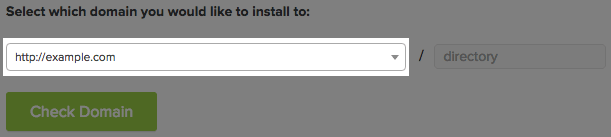
The directory section next to your domain name (see above image) can be left blank as we are installing WordPress on the root domain.
If your domain name is example.com, your root domain will be https://www.example.com
Once you have chosen your root domain, you can look at other details like email, username and password for this WordPress installation. You can change your email, username and password if required at the ‘advanced options’ section.
Please make a note of your username and password as you will need them later to login.
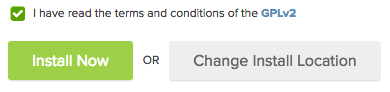
After this, just go through the service agreements and check those boxes. Then you can click the ‘install now’ button. (see below image)
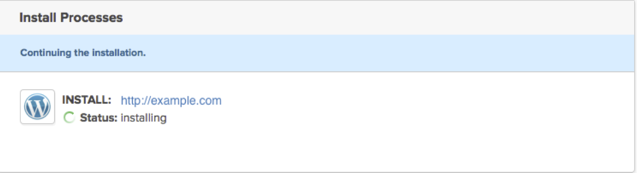
This will install WordPress on to your root domain.
Step 3: Login to your WordPress admin panel
After WordPress installation is completed, you can login to your WordPress admin panel (dashboard) to check everything is set up correctly.
You can reach your WordPress login page using the below URL:
www.example.com/wp-admin/ (replace example.com with your domain name)
Or you can access it from your Bluehost cPanel.
Use the same username and password that you entered while installing WordPress to login to the admin panel.
If you are able to login successfully, everything is working just fine.
In case, if you are not able to access the login page, don’t panic. It is quite normal for all the new WordPress installations as the changes might take some time to propagate.
Just contact Bluehost support through chat or call if you need further help. They will get it sorted for you in no time.
Step 4: Install a WordPress theme
WordPress blogs and websites work on themes. A WordPress theme will give your blog or website the structure it needs.
Also, a WordPress theme will make it easier for you to customize your blog or website as per your requirement.
Without a theme, you cannot run your WordPress blog.
There are free themes as well as paid themes. Your WordPress blog or website will already have 2 to 3 free themes pre-installed in it, and one of them will be activated.
As these free themes will have a lot of limitations, I would recommend going with a paid theme.
A good paid theme will let you customize your blog easily. Especially when you are a beginner, a paid theme can help you get started without much effort.
I recommend going with the theme ContentBerg from Themeforest. It is a simple and quickly customizable theme for professional bloggers.
You can get it for lifetime at $69 from Themeforest. It also comes with free future updates that you can download and install. (see below image)
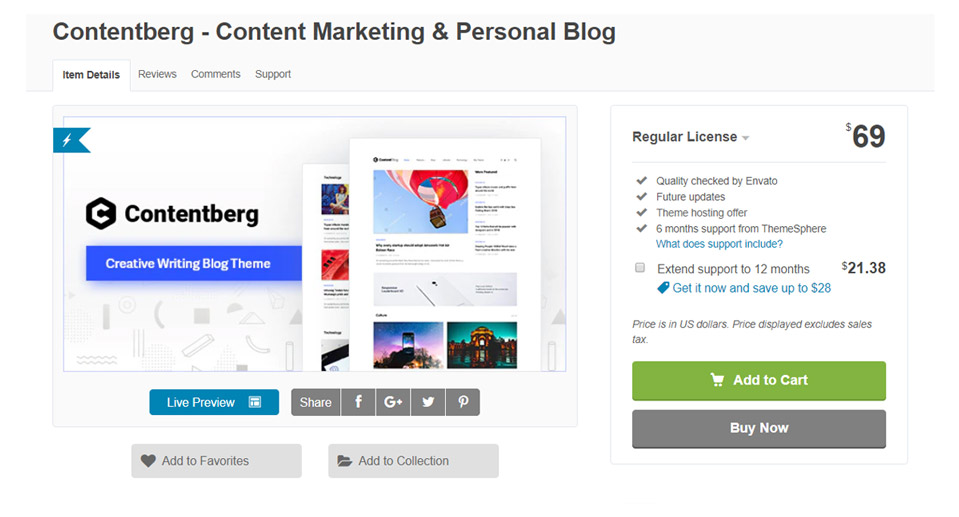
Once you are on Themeforest’s website, just click on the ‘buy now’ button (see above image), it will lead you to the purchase where you will need to create an account and make the payment.
Once you have purchased the theme, you will need to download a copy of it and install it on to your blog through the WordPress admin panel. The steps are as below.
Click on your account name and go to the ‘downloads’ page. (see below image)
On the downloads page, click on download, and choose ‘installable WordPress file only’ from the drop down. (see below image)
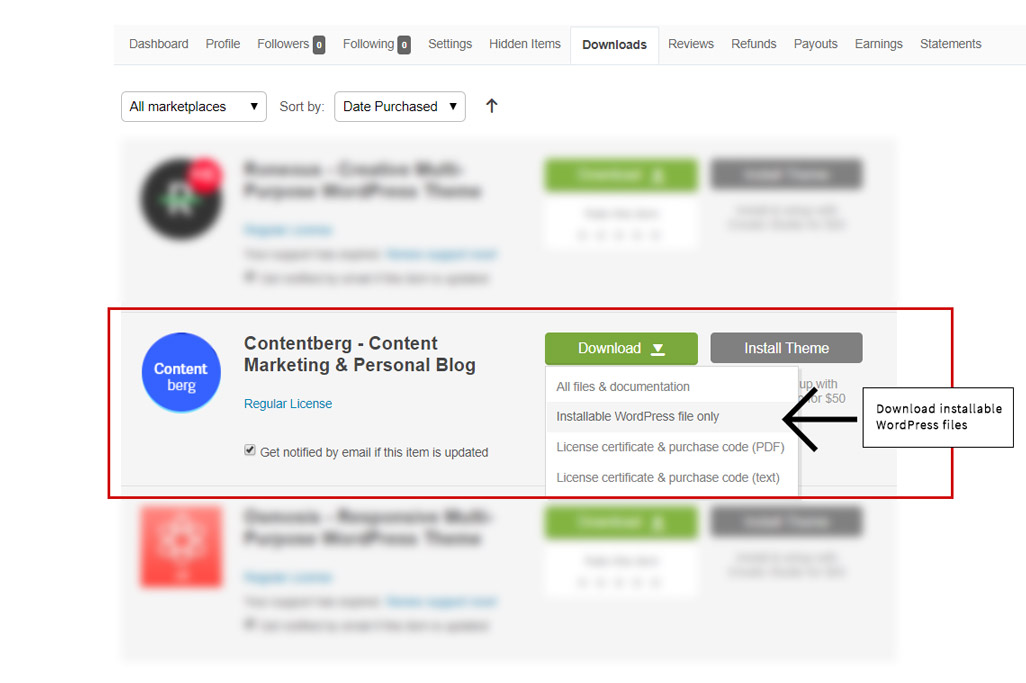
This will download the installable theme files in a .zip format.
Save the .zip file in a separate folder as you will need it to upload to your blog.
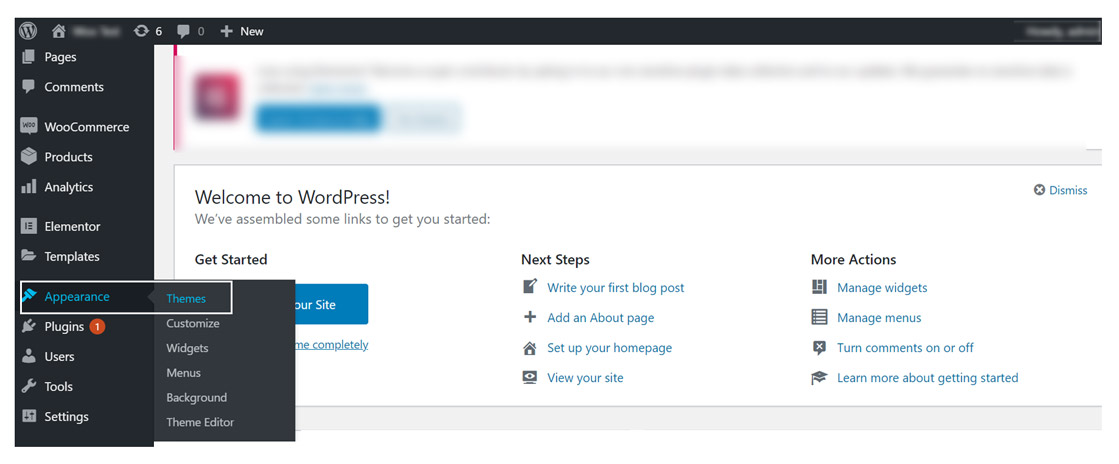
Now login to your WordPress admin panel by going to the URL www.example.com/wp-admin
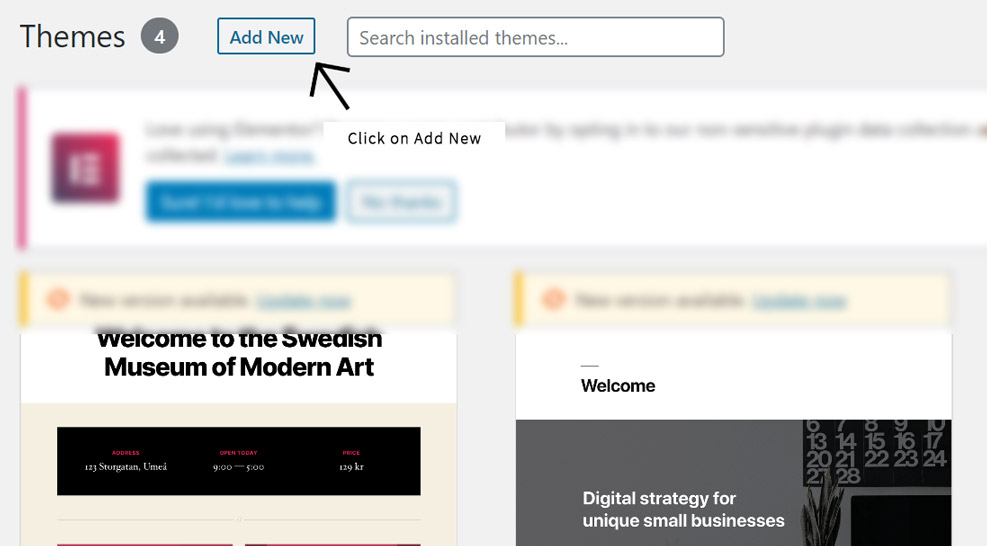
On the left-sided column, you can find a section called ‘appearance’ and below which you can find ‘themes’. (see below image)
Click on ‘themes’, and a new window will open where you can see your current free themes and the one which is already active. Click the ‘add new’ button on this page, which will help you add your newly purchased theme to your blog. (see below image)
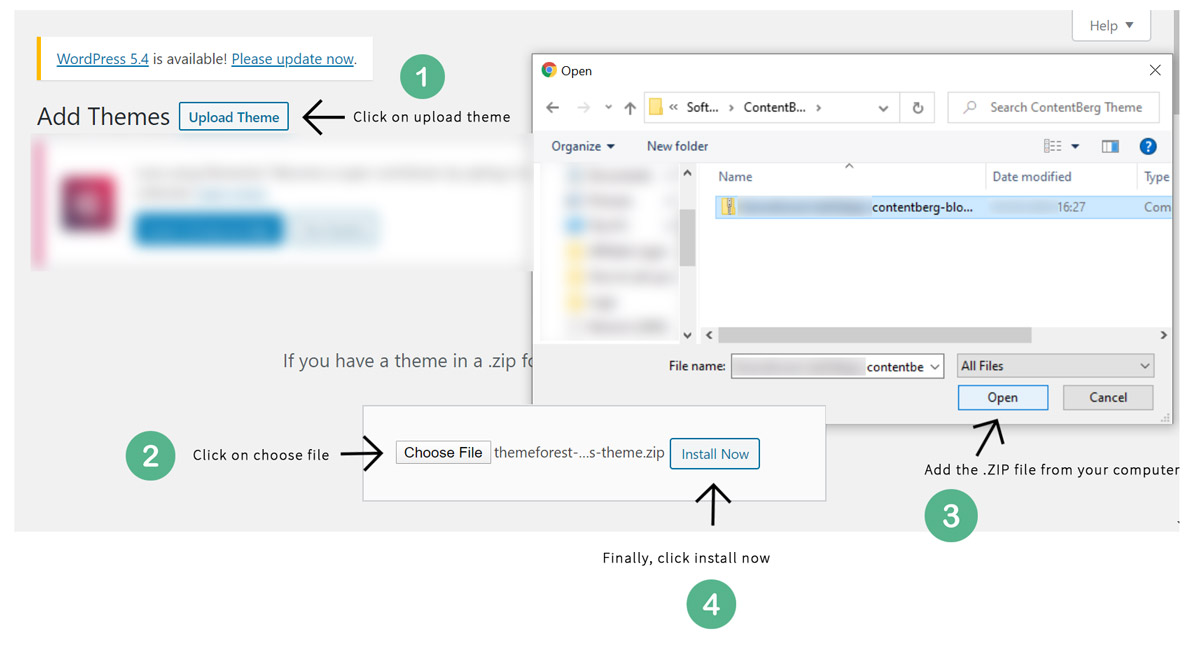
On clicking the ‘add new’ button, a new window will open where you can upload your purchased theme.
Steps to upload and install your purchased theme are given in the below image. Just follow the steps from 1 to 4 as shown in the image to install your theme.
The next steps in the process are specifically for the theme ‘ContentBerg’. If you are using any other purchased theme, it could be a little different.
After installing the theme, you can go ahead and activate it.
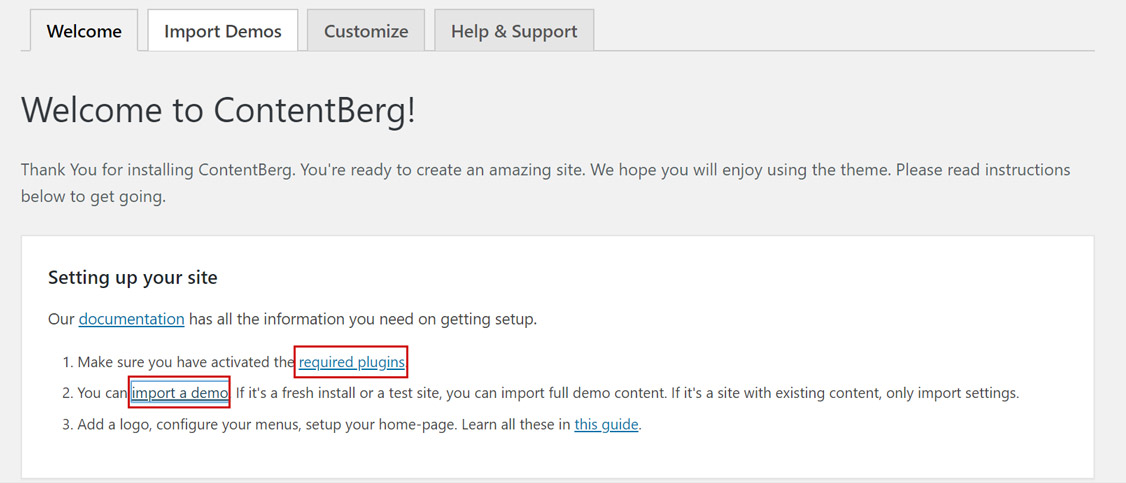
And once you have activated the ContentBerg theme successfully, you will be seeing a welcome page where you will be asked to register your theme.
To register your theme, you need to be logged into your Themeforest (Envato) account using the username and password that you created during theme purchase. Click on the button to ‘register’ your theme from the WordPress admin panel (near the theme’s welcome screen) and it should be completed within seconds.
Registering your purchased theme is required to get all the future updates from the theme author.
After the theme registration is completed, you need to perform 2 important steps. (see image below)
- Install plugins recommended by the theme
- Import theme demos
First, you need to install the required plugins and then move on to importing the demo content.
Importing a demo basically helps you to set up a dummy blog. It will have all the elements like a logo, images, blog posts etc. But all of these will be dummy content, and you need to replace them with your own original content.
So, let’s start with the plugins.
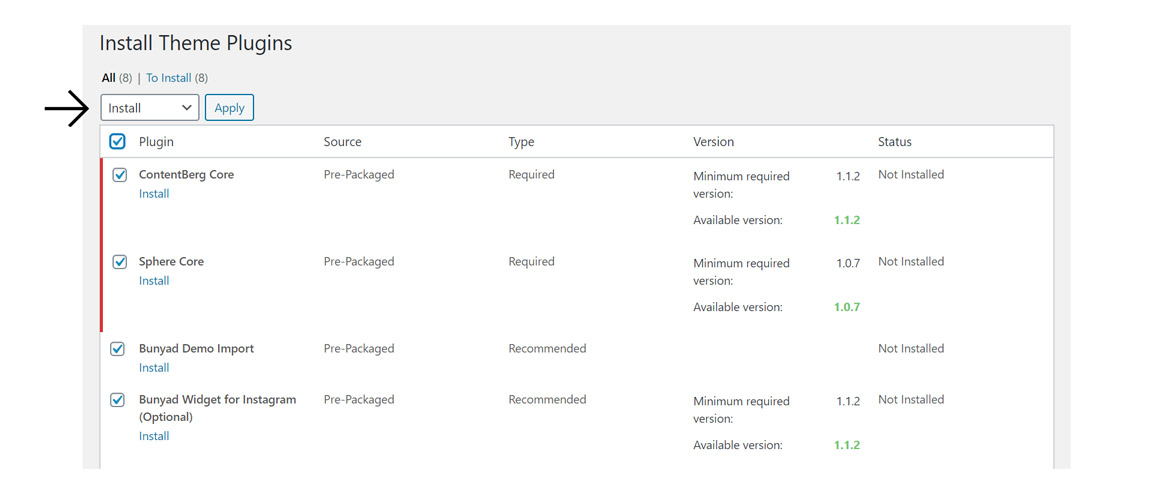
You can click on the ‘required plugins’ link from the welcome screen of ContentBerg theme to activate all the essential plugins.
It will take you to a window where you can see all the plugins. You need to install about 8 essential plugins given by ContentBerg theme. Other than this, there are a few additional plugins which are not recommended for beginners.
You can just select all the 8 plugins, choose install and click apply. This will install all of those plugins in no time.
Once this is done, you need to come back to the welcome screen of ContentBerg theme. You will see ContentBerg as an item on the left sided column within the WordPress admin panel. You can click on that to see the welcome screen of the theme.
Again from there, you can click on the ‘import a demo’ link to reach a page where you can see the different variations of demo content offered by ContentBerg theme. (see below image)
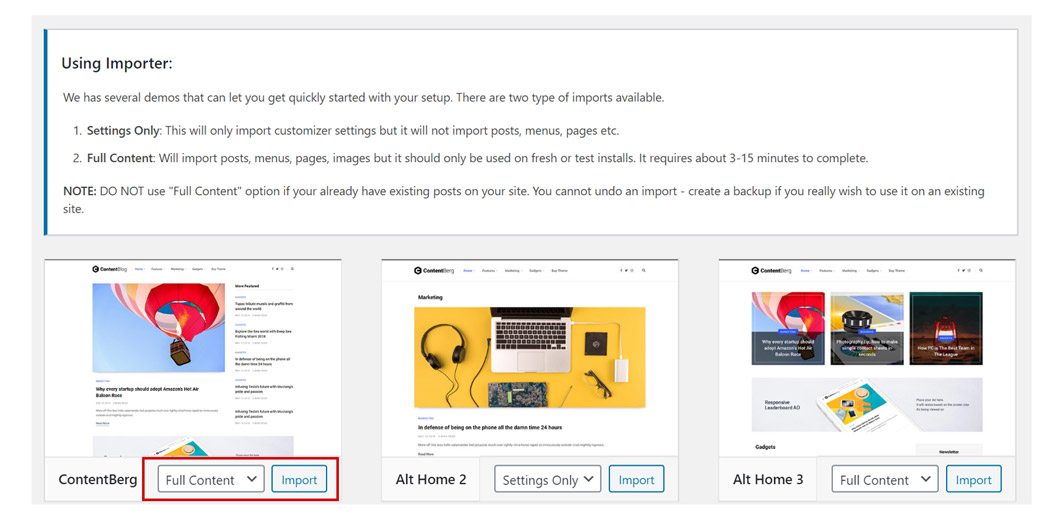
Go through the instructions given on this page about two types of demo imports available. Depending on your requirement, you can either go for ‘settings only’ or ‘full content’ demo import.
Click on the ‘import’ button after choosing your desired demo style and the settings. This will complete the demo import process within minutes.
If your demo import is successful, you should be able to see a dummy blog on your home URL (www.example.com) like the one given below.

If you selected the ‘full content’ option during demo import, it would have imported a lot of additional posts and pages. You will need to delete all of them while creating your own pages and posts.
Another important aspect is the logo. You need to replace the existing ContentBerg logo with your own blog’s logo. You can get a logo designed by a local designer or hire a good designer from a platform like Fiverr.
You may refer to the Contentberg theme documentation for detailed steps on managing your demo content.
Now that we have installed a theme on your blog and imported the demo. The process of setting up a WordPress blog is 80% done.
However, we have a few more important steps to be completed.
Step 5: Create a child theme and activate it
Many beginner bloggers tend to overlook this step.
A child theme is a must for any properly built WordPress blog or website.
So what is a child theme after all?
A child theme is a theme created from a main theme (parent theme) installed on your website inheriting all its capabilities like styling and functionality
Normally, blog owners tend to make a lot of customizations on their blog’s theme. These customizations could get erased when you install updates to your main theme (parent theme).
Purchased themes receive regular updates from theme authors containing bug fixes and other technical improvements. So ideally, we shouldn’t be ignoring any of these updates.
The recommended method to receive theme updates and at the same time preserve your customizations is to have a child theme.
You can create a child theme from your main theme and keep it activated. Please note that, you will have to install both the parent as well as child theme (and activate only the child theme). All the updates that you receive on your theme will go to the parent theme, but your website customizations will remain intact as they are on your child theme.
I hope you are clear about the importance of having a child theme.
Now, let’s look at how we can create a child theme for your ContentBerg theme.
If you have already activated your ContentBerg theme and imported the demo, you can go ahead and create a child theme.
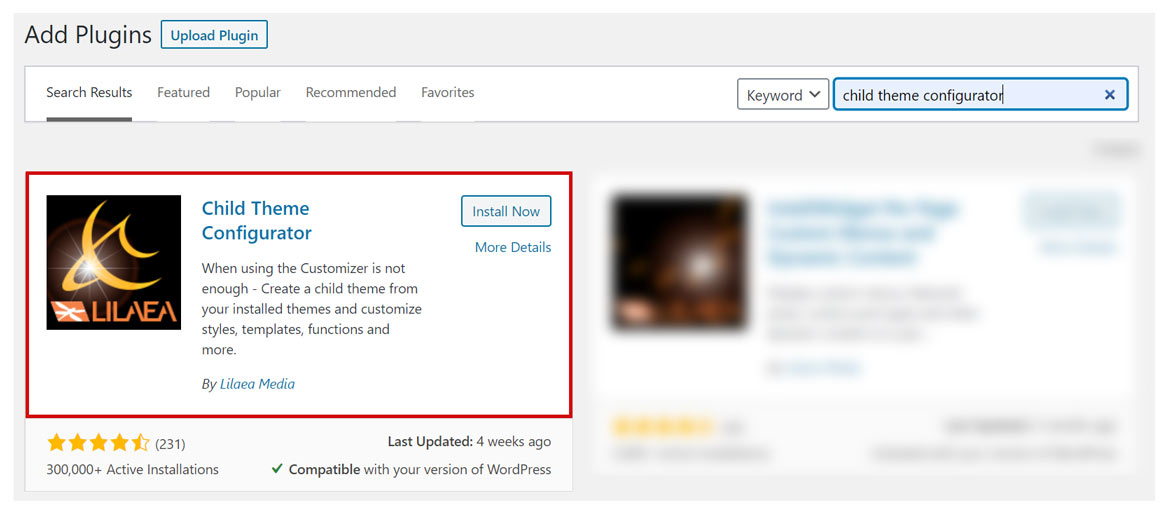
To create a child theme, you need to install a free plugin called ‘Child Theme Configurator’. This will help you create a child theme from your main theme within seconds.
You can go to the plugins section on the left sided column in the WordPress dashboard and click ‘add new’. This will show you a page where popular WordPress plugins are shown. You can search for ‘Child Theme Configurator’ there to find the plugin. (see below image)
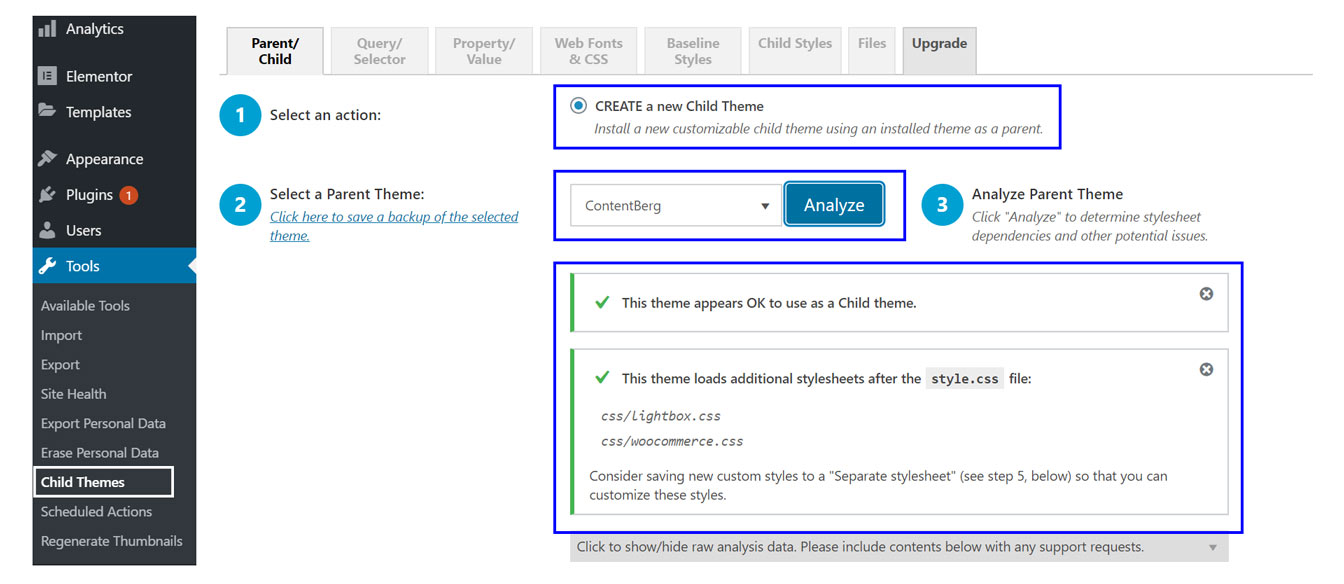
After installing the plugin, you can go to ‘child themes’ from the ‘tools’ section on the left sided column in WordPress admin panel.
On the next page, you can see the different steps to create a child theme from your main theme (parent theme).
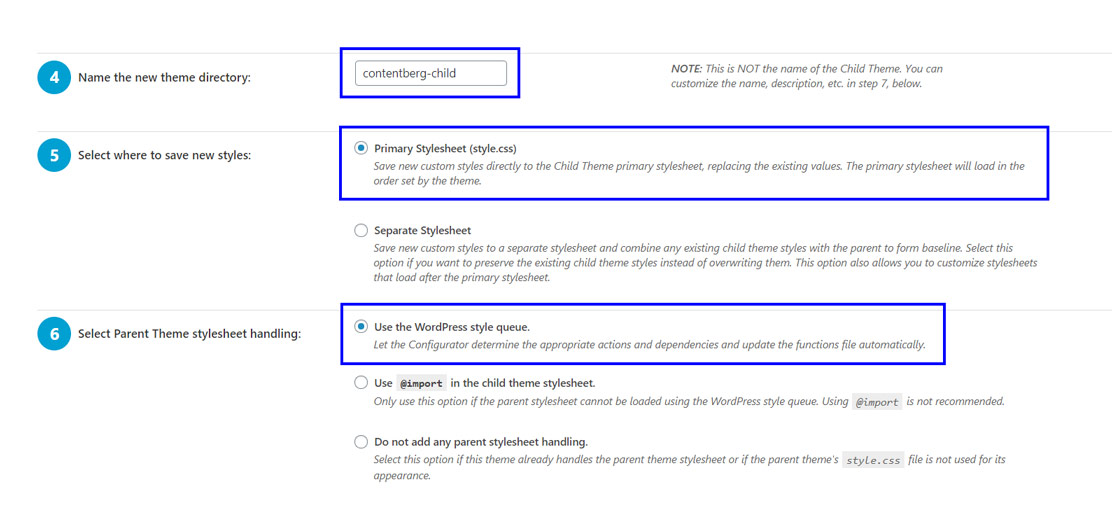
Once you are on this page, you will need to follow certain steps to create a child theme. The steps are numbered from 1 to 9 with instructions. (see below images)
You can just follow the steps from these images and pay attention to the areas marked with blue rectangles.
Start with step 1 and click analyze in step 2. This will analyze your parent theme and tell you whether the theme appears okay to be used as a child theme.
For all other steps until step 9, you can follow the exact same settings as shown in the below images.
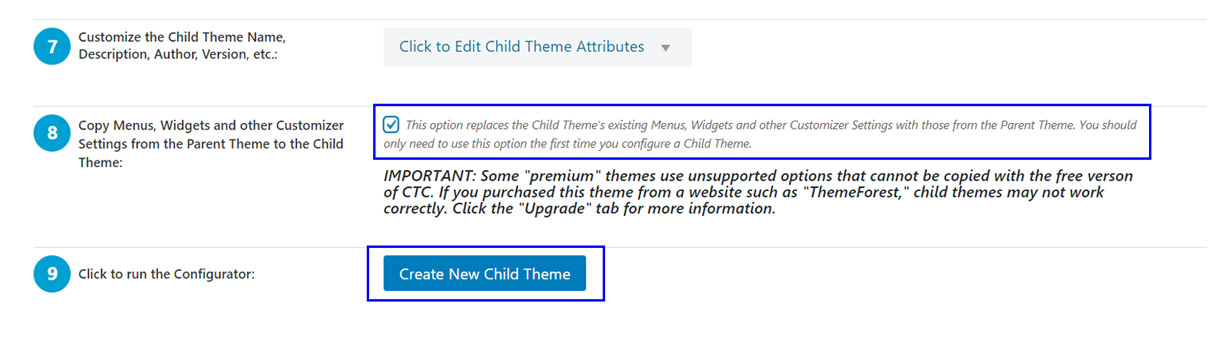
If all your steps are done correctly, you should get a fully functional child theme.
You can preview your child theme and make sure everything appears to be normal before activating it.
After activating your child theme, we can move to the next step.
Step 6: Install other plugins
Other than the ones suggested by ContentBerg theme, you might require some additional plugins to make customizations to your blog.
From the WordPress dashboard, you can go to ‘plugins’ and click ‘add new’ to find the desired plugins and install them.
There are a few things to note while installing plugins.
- Try to keep the number of plugins less on your WordPress blog. There is no definite number, but try to keep it below 20 plugins for a smoothly functioning blog or website.
- Install only well coded and regularly updated plugins. Before installing any plugin, look at its number of installations and the last updated date.
- Also, try to read some reviews about a plugin before installing it on your blog.
Here are a few helpful plugins that you can install on your blog.
- Contact Form 7: It will help you create simple contact forms on your blog by just placing a short code.
- RankMath SEO: I recommend this plugin to do all the SEO activities on your blog.
- Classic Editor: Install this plugin if you find it difficult to use the current Gutenberg editor on WordPress posts and pages.
- Wordfence Security: It will keep your blog secure from malware attacks and other hackers. Also, you can enable 2 factor authentication for your login with this plugin.
Step 7: Create pages & posts
You have your WordPress blog ready in front of you.
But there are a few final touches that we need to do which I am going to list down below.
Create important pages
I will explain how to create pages on your WordPress blog and then tell you which are the important pages that need to be created.
From your WordPress dashboard, you can click on ‘pages’ and then ‘add new’. It will take you to a window where you can create a new page.
Well, normally there are two ways you can create new pages on a WordPress blog.
You can either create it using the default Gutenberg editor (block editor) or install the Classic Editor plugin and use that to create a page.
And in case if you are using a theme like ContentBerg that we mentioned in this article, you will have a page builder plugin called WPBakery Page Builder installed on your blog. You can use this plugin to create a more attractive page.
For your understanding I have included the screenshots of these 3 scenarios.
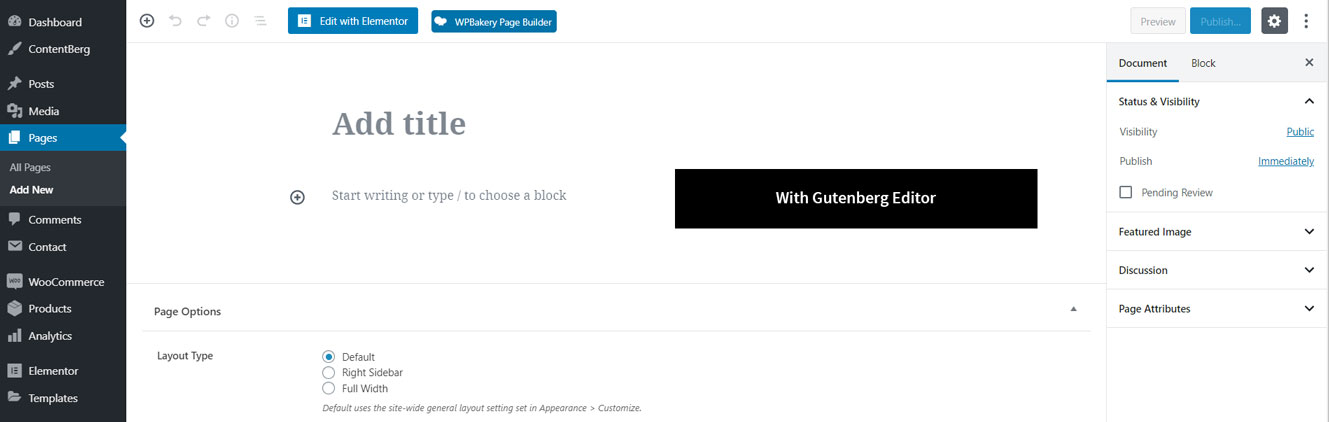
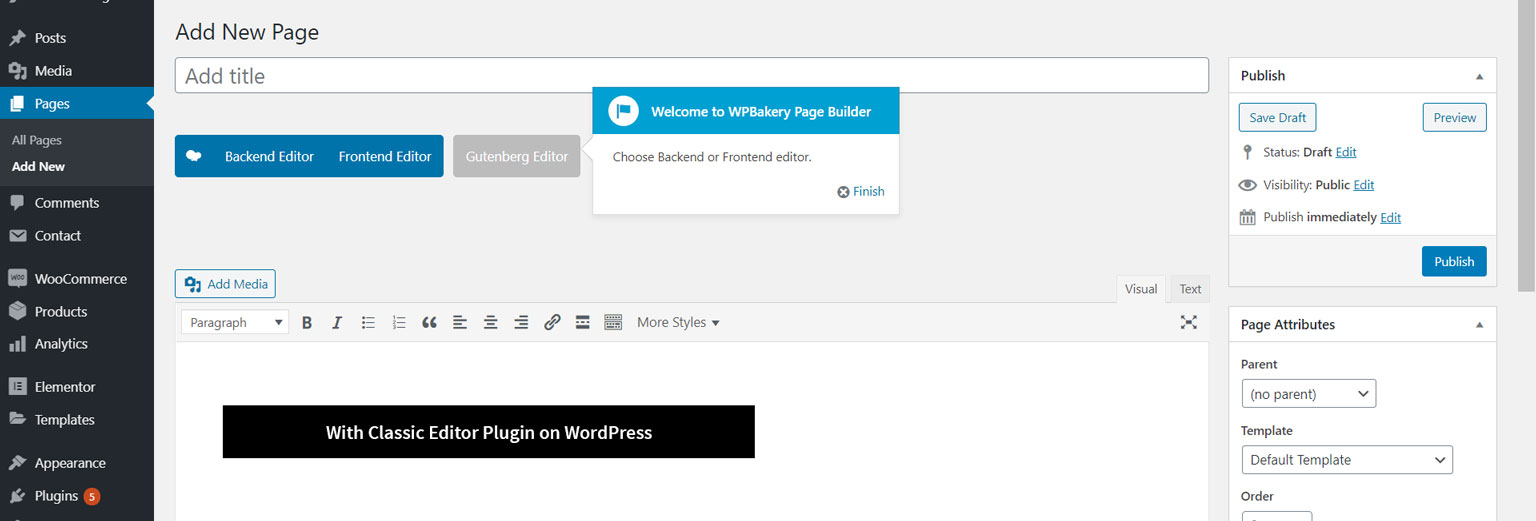
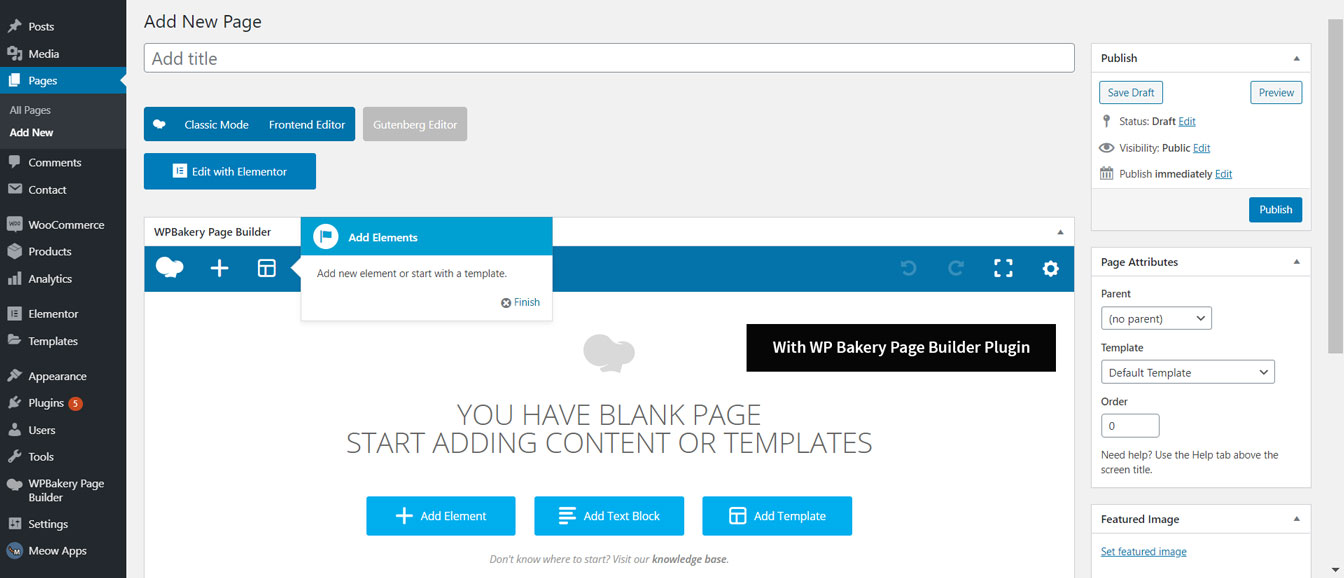
So you can follow either of these methods to create pages on your wordpress blog.
Be sure to create the below important pages on your blog.
- Homepage (Posts page: This is where you will showcase all your new blog posts)
- About page (This page will talk about you, the purpose of your blog etc.)
- Contact (Page with your contact details and an enquiry form)
These are the most essential pages that you need to have on your blog. This could be the most minimal set up that you can do, and you can quickly start writing and publishing blog posts.
However, feel free to add any other pages that you think is necessary.
In this case, we are making the homepage as the posts page. That means, all the newly published blog posts will appear on your homepage.
Alternatively, you can create a static homepage where you can showcase details about you, your top blog posts, some products that you intend to sell etc.
Making the homepage as the posts page will be an easier option for any beginner.
Just giving 2 examples to see the difference between two.
Homepage as posts page: https://digitaldeepak.com/
A static homepage: https://www.digitug.com/
Publish posts, create categories and tags
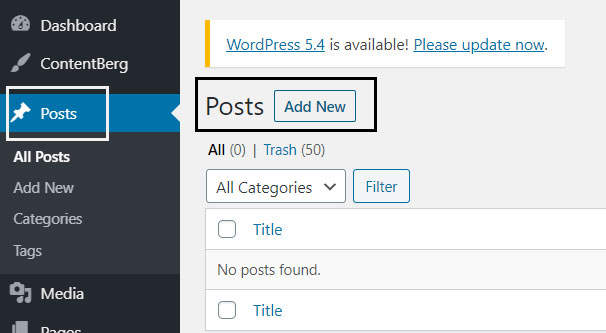
To publish a new blog post, you need to go to ‘posts’ from the WordPress dashboard and click ‘add new’.
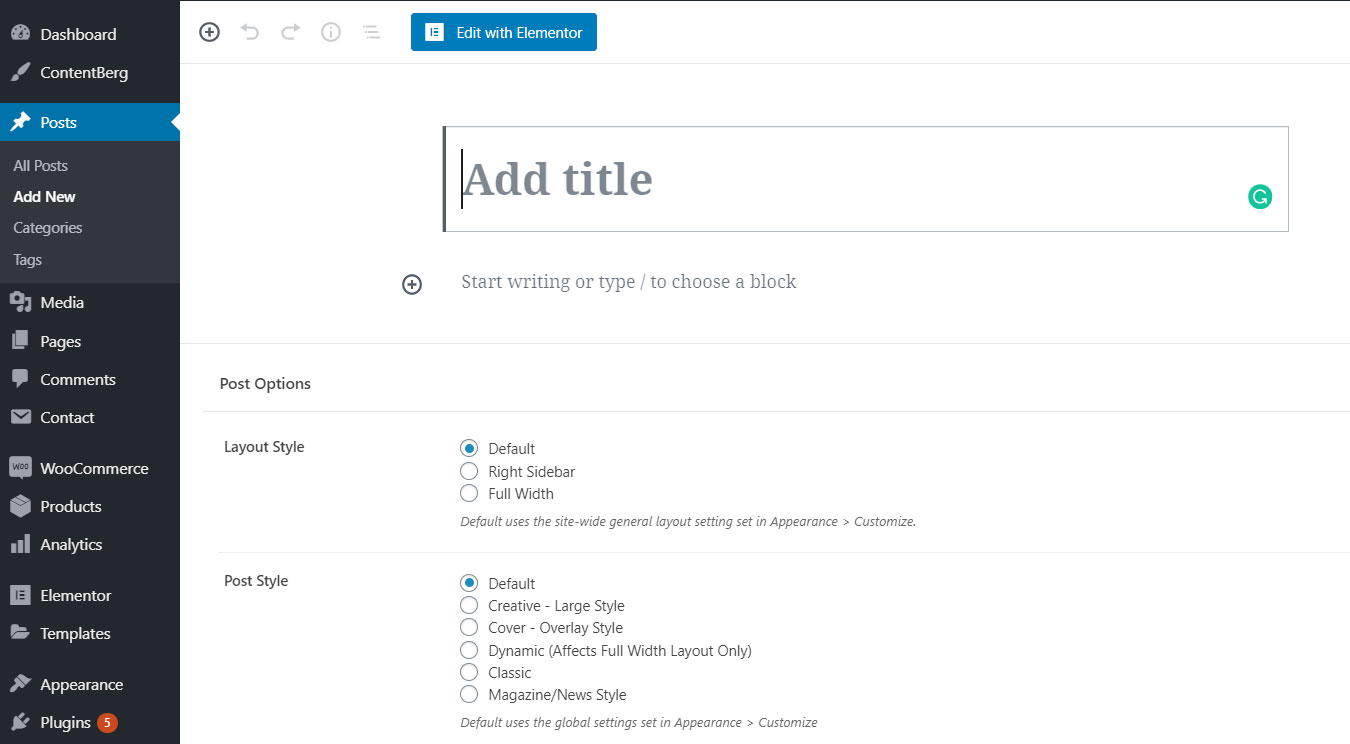
Then you will be taken to a window where you can copy and paste your blog content from another application like Microsoft Word or Google Docs.
Just like we created a page above, you will have three options to create a post here.
- Use Gutenberg editor (block editor)
- Use Classic editor with the help of a plugin
- Use WPBakery page builder plugin
Use any one of these options and create a post. Make sure you align your text and images properly.
Then assign categories, tags and featured images (main image) for your blog posts. This is a critical aspect of a well structured blog.
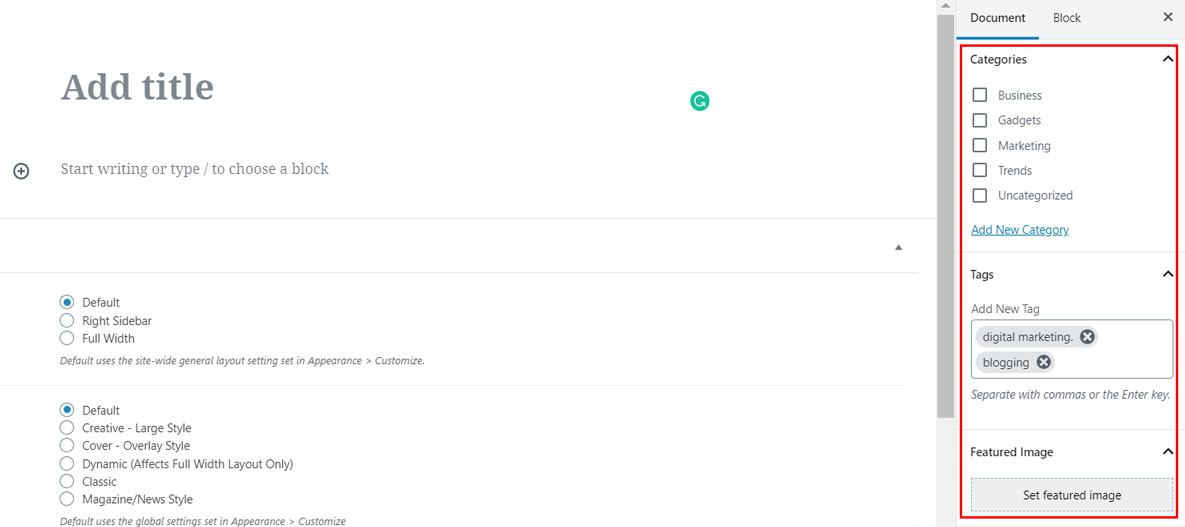
You can categorize your blog posts based on topics. For example, all articles related to email marketing can come under a category named email marketing. Similarly, you can add multiple categories for multiple topics.
For each blog post, you can add tags which will be terms related to your blog post’s topic.
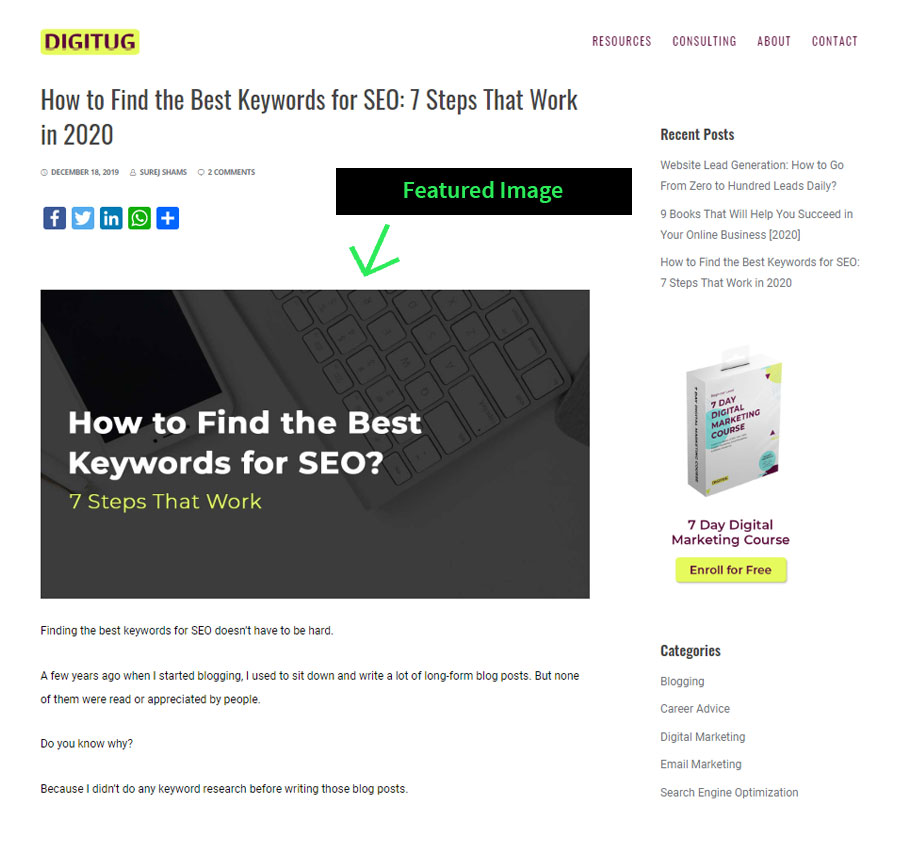
Then finally include a featured image. Remember, featured image is different from the images that you include within your blog post. I highly recommend adding enough relevant images within your blog post.
I haven’t really included much information about writing blog posts in this article as it is more about setting up your WordPress blog.
So if you have your blog posts ready, you can go ahead and publish them. Or spend some time to research and write blogs to publish them.
Other areas on your blog
Other than pages and posts, make sure your WordPress blog is functioning properly and all the URLs are accessible.
Now, we need to integrate your WordPress blog to 2 important tools. These are Google Analytics and Google Search Console.
Google Analytics is needed to track the performance of your blog. With Google Analytics, you will be able to track the below metrics related to your blog.
- Number of people visiting your blog
- Most visited pages and posts on your blog
- Time spent by visitors on your blog
- Your traffic sources (how visitors are coming to your blog)
- Specific actions taken by visitors on your blog
Now, the second tool, Google Search Console is required for doing SEO on your blog. It will tell you how your website is performing in organic search and will also give you some suggestions to improve it.
You can connect your WordPress blog to these two tools using a simple plugin offered by Google. This plugin is called Google Site Kit.

You only have to connect your Google account to this plugin. The plugin will start to track data from your website and you will be able to see your essential metrics on tools like Google Analytics and Google Search Console.
Conclusion
That’s all folks. If you have followed the steps I mentioned above, you should have a decent looking WordPress blog by now.
Just be sure to make use of the screenshots for a better understanding.
This article will help you set up your WordPress blog if you are a total beginner. However, I would recommend learning more about WordPress and blogging as you progress.
As you learn more about WordPress, you will be able to bring in more customizations and advanced settings to your blog.
Also, in case if you are stuck in setting up your WordPress blog, feel free to comment below. I would be happy to help.
All the best.
Leave a Reply