If you have a WordPress website and want to build an email list, you can get started easily with the help of an email marketing tool like MailChimp.
Luckily, it is very easy to integrate MailChimp with your WordPress website with the help of a few plugins.
With this set up, you can create opt-in forms and lead magnets on your WordPress website to collect email addresses from your visitors.
So let’s see how we can start email list building on your WordPress site using MailChimp.
Getting started with MailChimp
MailChimp is a popular email marketing tool with free as well as paid plans.
Even with the help of their free plan, you can start building an email list on your WordPress website.
Here’s what’s actually included in their free plan.
- Include up to 2000 email contacts in your mailing list
- Send up to 12,000 emails in a month
- Send email campaigns and choose from templates
- Use name tags
- Create dedicated landing pages (custom domain not included)
- Create lead capturing forms
- Create automated email campaigns
- A/B testing
Basics of building an email list
Ideally, an email list should be built out of people who come to your website and sign up on your opt-in form to receive your email updates.
You shouldn’t be adding random email addresses to your email list by any chance.
And if you are buying email lists from third parties and blasting out email campaigns, get ready to receive that spammer title very soon.
But people are just not gonna come and sign up on your opt-in forms randomly, right?
Maybe they do, if you are Neil Patel or Seth Godin.
Interestingly, for people who aren’t experts, there is something that actually works.
It is called a Lead Magnet.
So this is how it works.
You offer your website visitors a freebie, and it will be accessible only if they sign up on your opt-in form with their name and email address.
The freebie that you are offering here can be given in various forms. You can easily give out downloadable ebooks, checklists, templates, worksheets or even email courses.
A lead magnet is a proven way to collect email addresses from your website visitors and build an engaging email list.
Below is an image of a lead magnet on Digitug.com

How to create and set up a working lead magnet?
You can create a lead magnet like an ebook or checklist and set it up on your WordPress website with the help of MailChimp and a few WordPress plugins.
The below steps will help you to set up a working lead magnet on your WordPress website.
Step 1: Create a compelling lead magnet
There are multiple options when it comes to lead magnets. Importantly, it should project as a compelling offer for your audience.
You can offer freebie downloads such as ebooks, checklists, worksheets etc. in exchange of email contacts.
This can be done with other free benefits such as email courses, video lessons, and webinars as well.
The whole aim of a lead magnet is to convert a website visitor into an email subscriber.
I have personally tried two lead magnets with a MailChimp free plan on one of my WordPress websites.
One was a free ebook download, and the second one was a free email course (a series of emails sent over a specific time period).
If you are trying for the first time, an ebook will be easier to set up than an email course.
Irrespective of your lead magnet type, always make sure your freebie download is really attractive and tempting.
It should be something that can really add value to your target audience.
You can write a small ebook on Microsoft Word and then convert it to PDF. Make sure it has a really attractive cover and you pack enough value within your ebook content.
You can then upload this ebook in PDF format to your media gallery to host it as a download. We will be covering more on this in the coming steps.
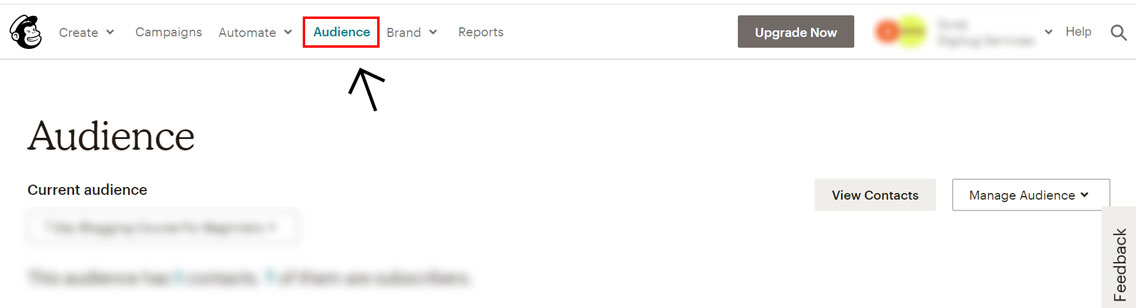
Step 2: Create an email list (audience) on MailChimp
You need to first create an email list (audience) on MailChimp to set up a lead magnet. Recently, MailChimp renamed their ’email list’ feature into ‘audience’. So in case if you don’t find an option called ’email lists’ within MailChimp, no need to worry, just head over to ‘audiences’.
You can directly go to the ‘Audience’ tab on MailChimp dashboard and create one with a few clicks. (see below image)
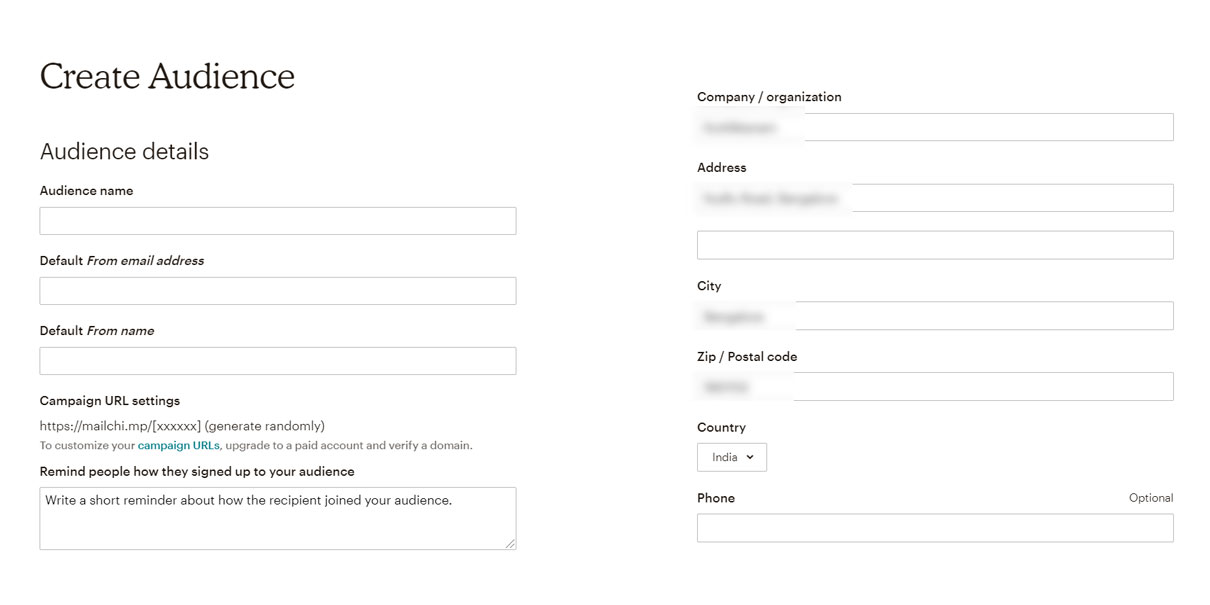
In the next window, click on ‘create audience’. (see below image)

In the next step, you will have to enter all the required details to create an audience or email list. (see below image)
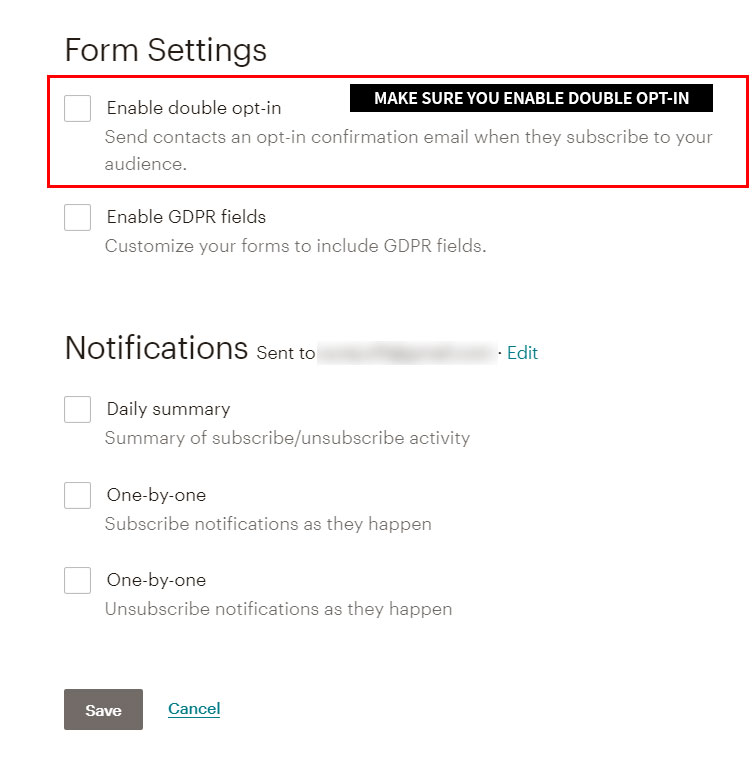
In the same window, you will also have to choose the form settings. On which make sure you enable double opt-in. This is a critical step in setting up your lead magnet.
Check the GDPR fields if you belong to the EU region. Also, choose how you want to receive your subscriber notifications. (see below image)
After choosing all the relevant settings, click on save and it will create a new audience on MailChimp.
When we create a new audience or email list, it will not have any email addresses in it.
So, in the next step, we are going to place an opt-in form on your website to collect email addresses from website visitors.
This opt-in form will add email contacts to the audience or email list that we just created above.
Step 3: Place an opt-in form on your WordPress website
There are multiple ways to place an opt-in form on your WordPress website and connect it to your MailChimp account.
The easiest way is to use plugins.
You will need 2 plugins for this set up to work.
- Contact Form 7 (to create an opt-in form on your website)
- Contact Form 7 Extension for MailChimp (to connect your opt-in form with MailChimp audiences)
You can go ahead and install these 2 plugins from your WordPress dashboard.
Please note, in case Contact Form 7 Extension for MailChimp plugin is not working on your website, you can try and install another plugin called MailChimp for WordPress. This plugin also helps in connecting your MailChimp account with your WordPress website. However, Contact Form 7 Extension for MailChimp is easy to use and you will have the option to connect multiple audiences and forms.
Then go to ‘Contact Forms’ from your WordPress dashboard and create a new form with only ‘name’ and ’email address’ fields. This will be your new opt-in form. (see below images)
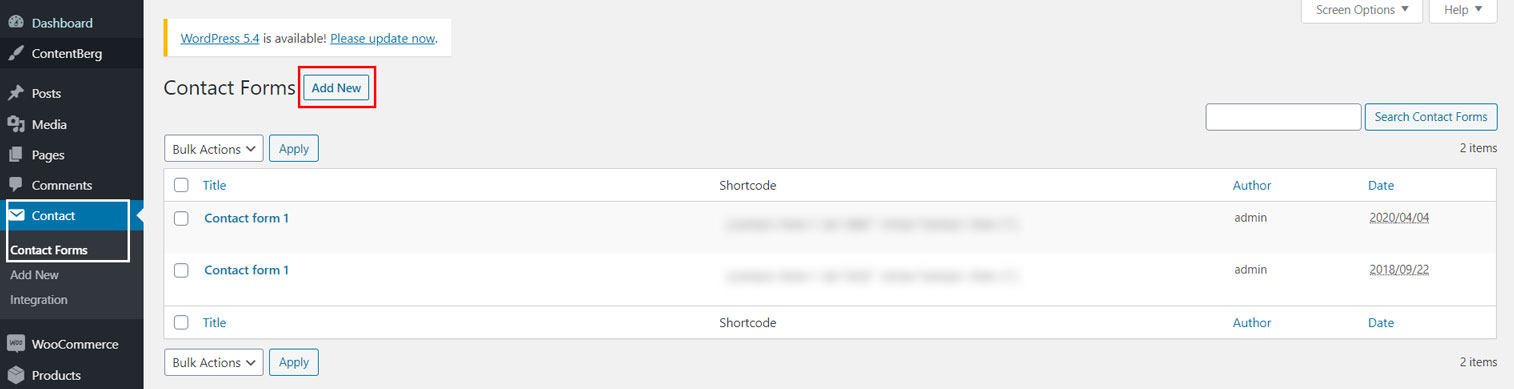
Adding New Contact Form: Image 1

Adding New Contact Form: Image 2
Once a new contact form is added, you can connect it to your MailChimp account and audience (email list).
To do this, you should have the Contact Form 7 Extension for MailChimp plugin installed on your website.
If you have already installed and activated it, you will be able to see a tab called ‘ChimpMatic Lite’ inside your newly created opt-in form. (see below image)
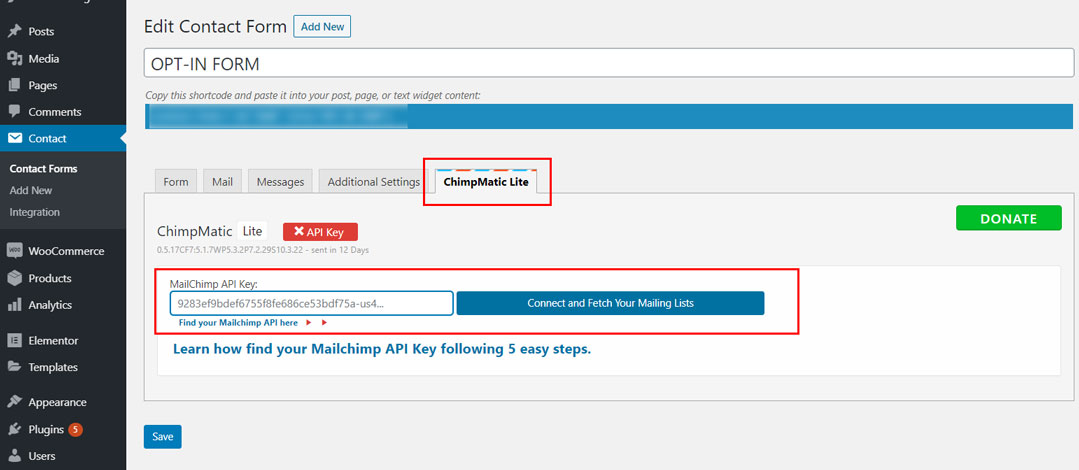
As shown in the image above, you need to connect this opt-in form to your MailChimp account using the MailChimp API Key.
To find your API key, login to your MailChimp account and follow the below steps.
- From the account dashboard (the page you find after logging in), click on the drop-down menu on the top right corner.
- Click on ‘account’ option from the drop-down menu.
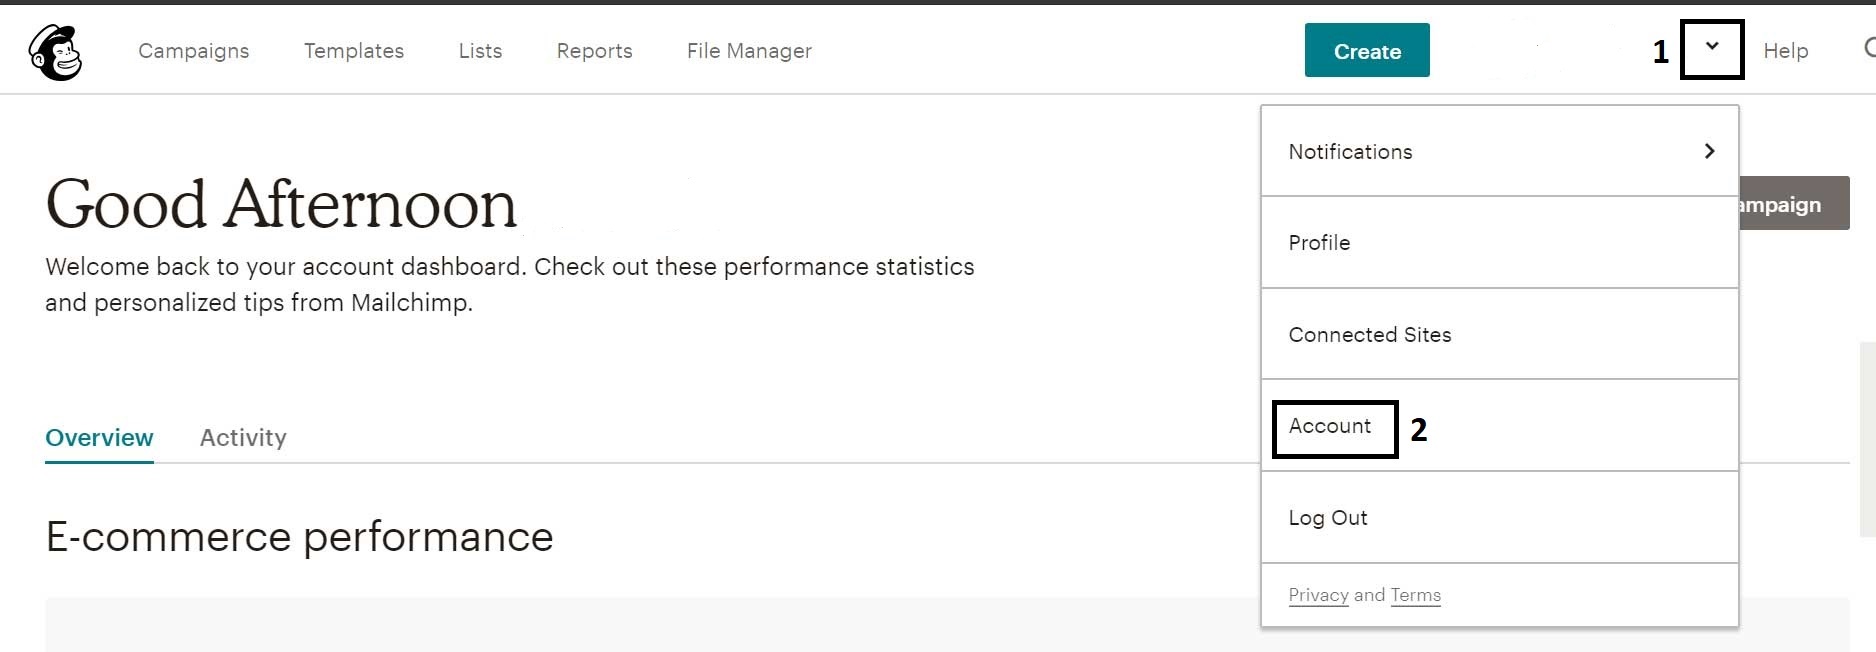
- On the account page, find the extras tab
- Click on API Keys in extras tab
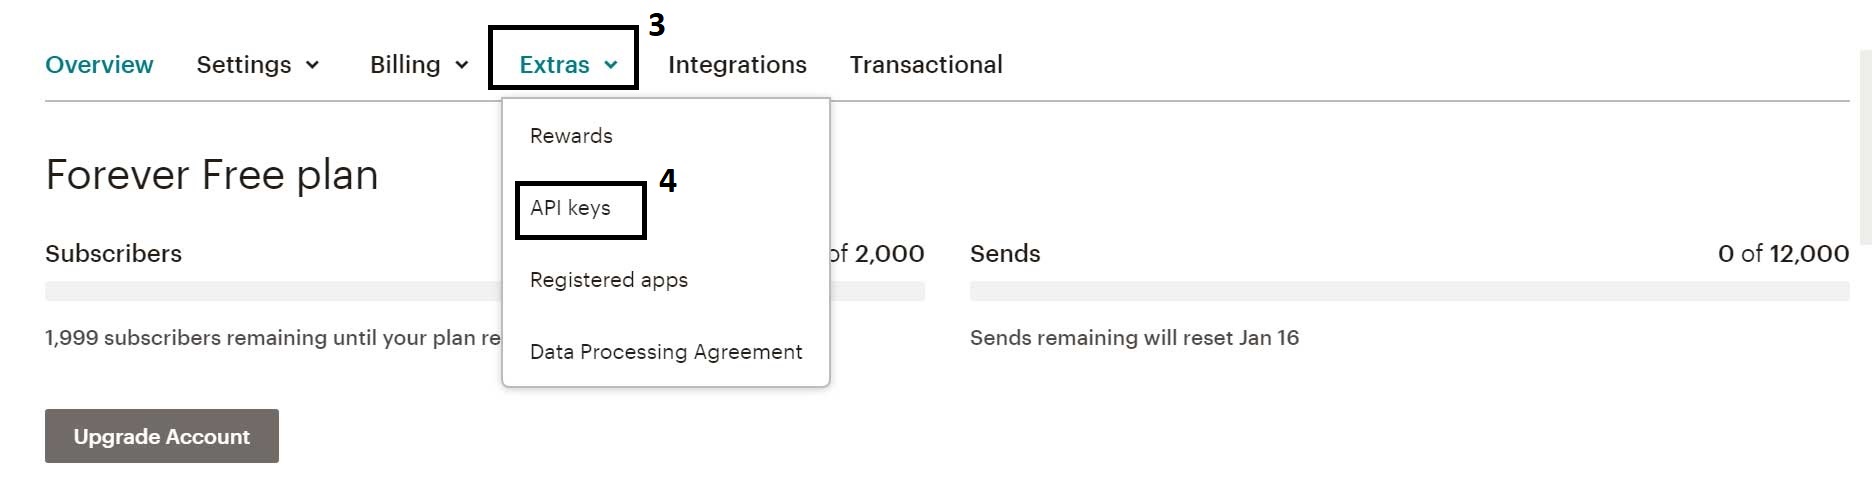
5. On the API Keys page, you will find the API Key for your account. It will be an alphanumeric code, and it is not be shared with anyone.
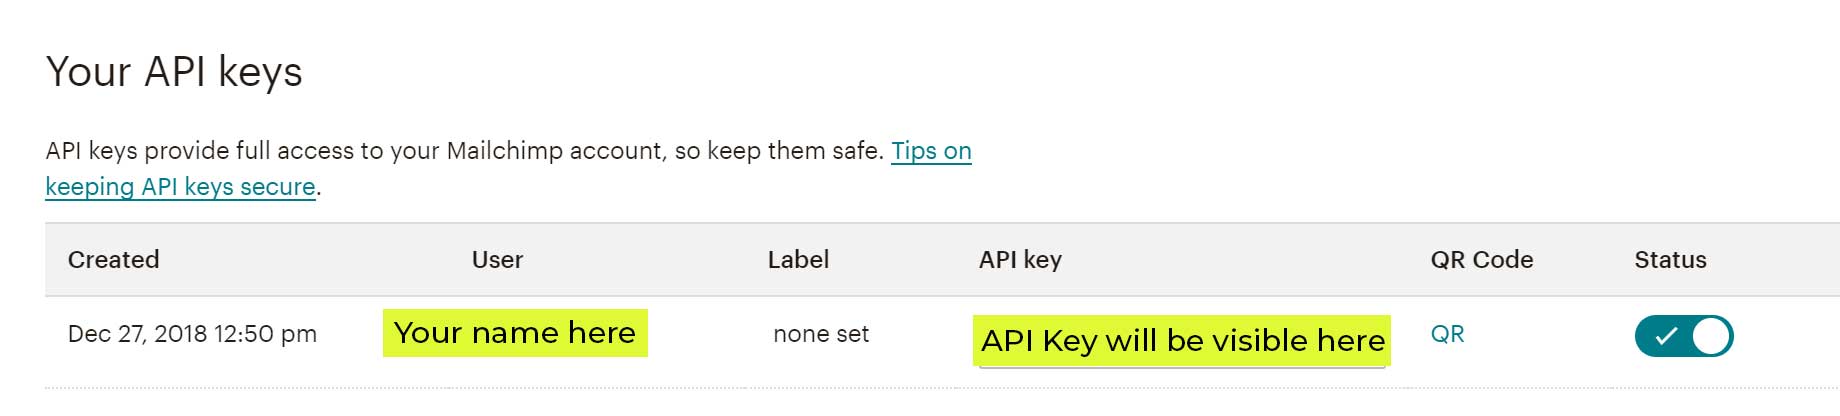
Now copy the API key from your MailChimp account and enter it in the space provided within Contact Form 7 plugin (in your newly created opt-in form).
Once you have connected your MailChimp account to this opt-in form, you will be able to fetch your mailing lists (audiences) within Contact Form 7 plugin. Here, you will have to choose the right audience or email list that needs to be connected to the opt-in form.
Once you have completed this step, your opt-in form should be successfully connected to your MailChimp account and the newly created audience (email list).
Step 4: Decide the work flow of the lead magnet
Ideally, this is how the lead magnet should work.
Once you set it up, it should add subscribers to your list automatically, even when you are sound asleep.
Here’s the step by step process flow.
- A visitor comes to your website
- Sees your lead magnet (free ebook) and finds it interesting
- Signs up on your opt-in form to get the ebook
- Receives an email asking them to confirm subscription.
- Clicks on the ‘confirm subscription’ button in that mail body and gets redirected to a thank you page. (The user is successfully added to your email list in this step)
- This thank you page will have the downloadable freebie that users can download with the click of a button.
- The newly added subscriber receives a welcome email from you in the next 5 minutes.
An alternative to sending your subscribers to a thank you page (step 5 in the above list) is to place the download link within a second email that the subscriber will receive right after he confirms subscription.
But I would say redirecting the subscriber back to your website for the download will be a better idea than just giving him the download link in an email.
Step 5: Host your downloadable lead magnet
The next step is to host the lead magnet (eg. downloadable ebook) so that it will be available to download for everyone who signs up on your opt-in form.
On a WordPress website, an ebook in PDF format can be uploaded to the media library and the URL can be copied. (see below image)
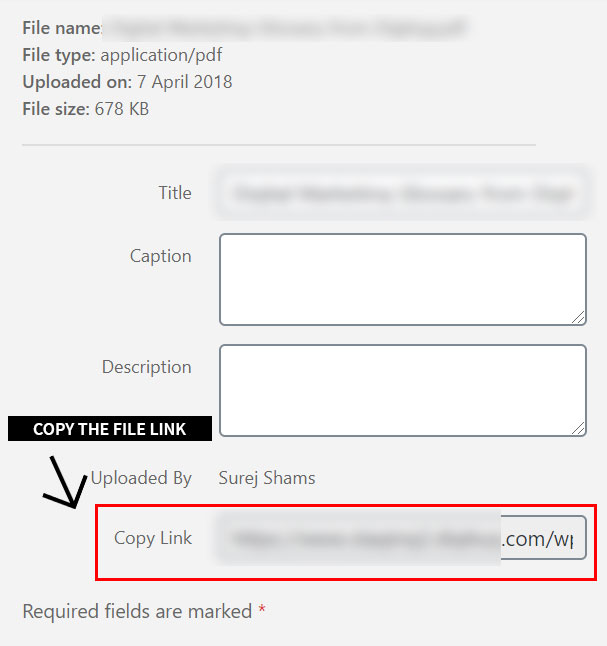
People clicking on this URL will be able to directly download the free book.
The best thing you can do is to create a thank you page and give a download button on this page that links to the downloadable file that we have already hosted in the media library in WordPress.
If you use a page builder plugin like Elementor, you can set up a beautiful button with a few clicks.
Now, to direct the users to this thank you page, we need to add a link to this page on the opt-in confirmation email.
Please note, you should enable double opt-in for your audience or email list to send out an automated opt-in confirmation email. The steps are mentioned in the audience/email list creation part above.
When people click on the ‘confirm subscription’ button within the mail, they should reach this thank you page.
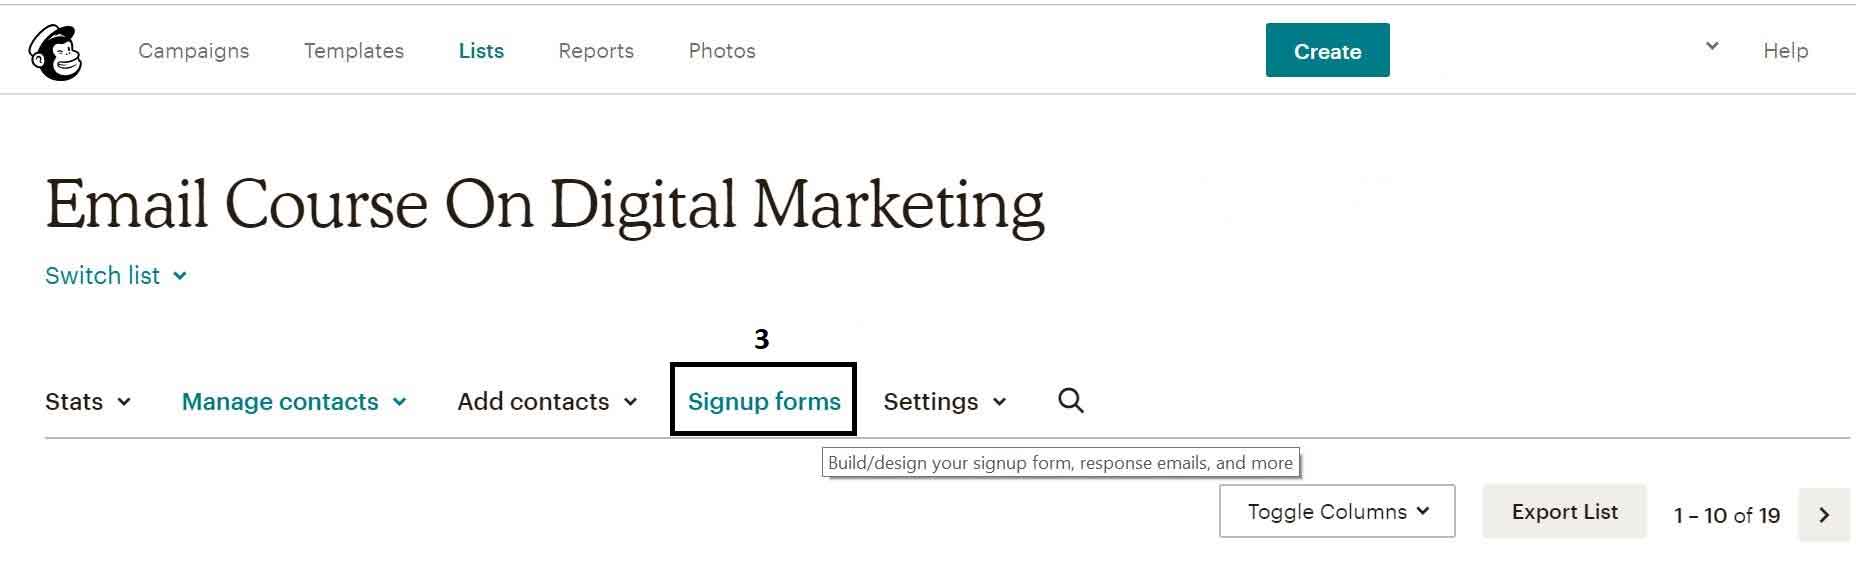
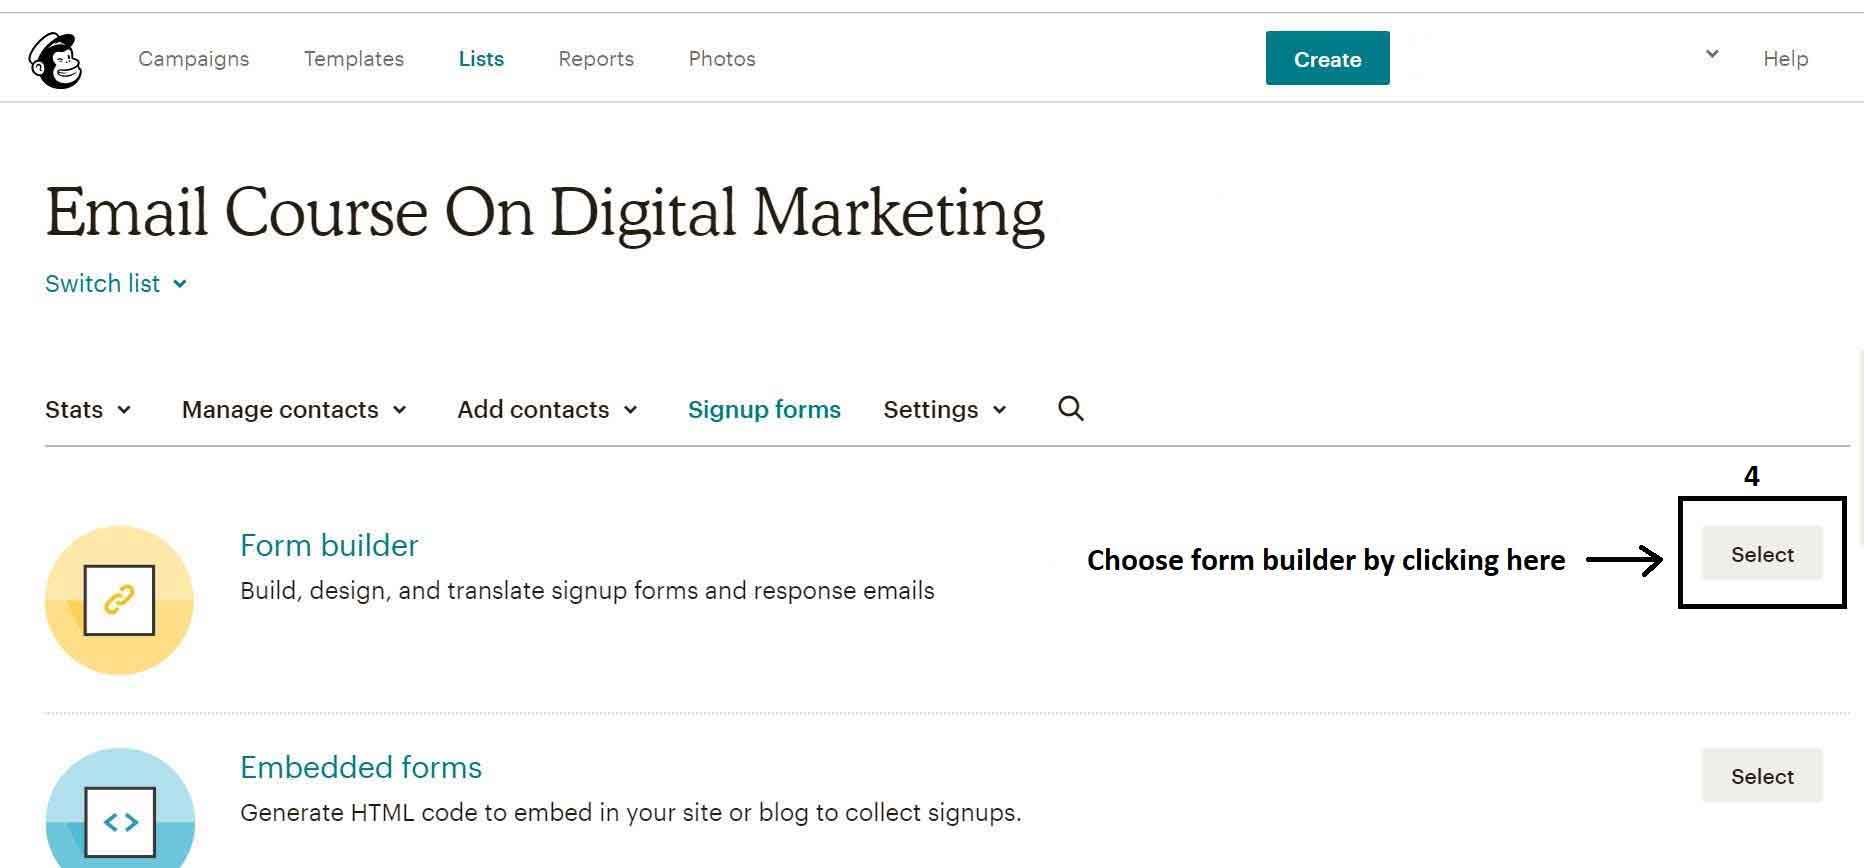
You can do it by following the below steps within your MailChimp account.
1. Click on the ‘Audiences’ or ‘Lists’ tab inside MailChimp dashboard (the page that you see when you log-in)
2. Click on the ‘audience’ or ‘list’ that you want to edit
3. Click on ‘Sign up forms’
4. Choose ‘form builder’ from the window that appears next
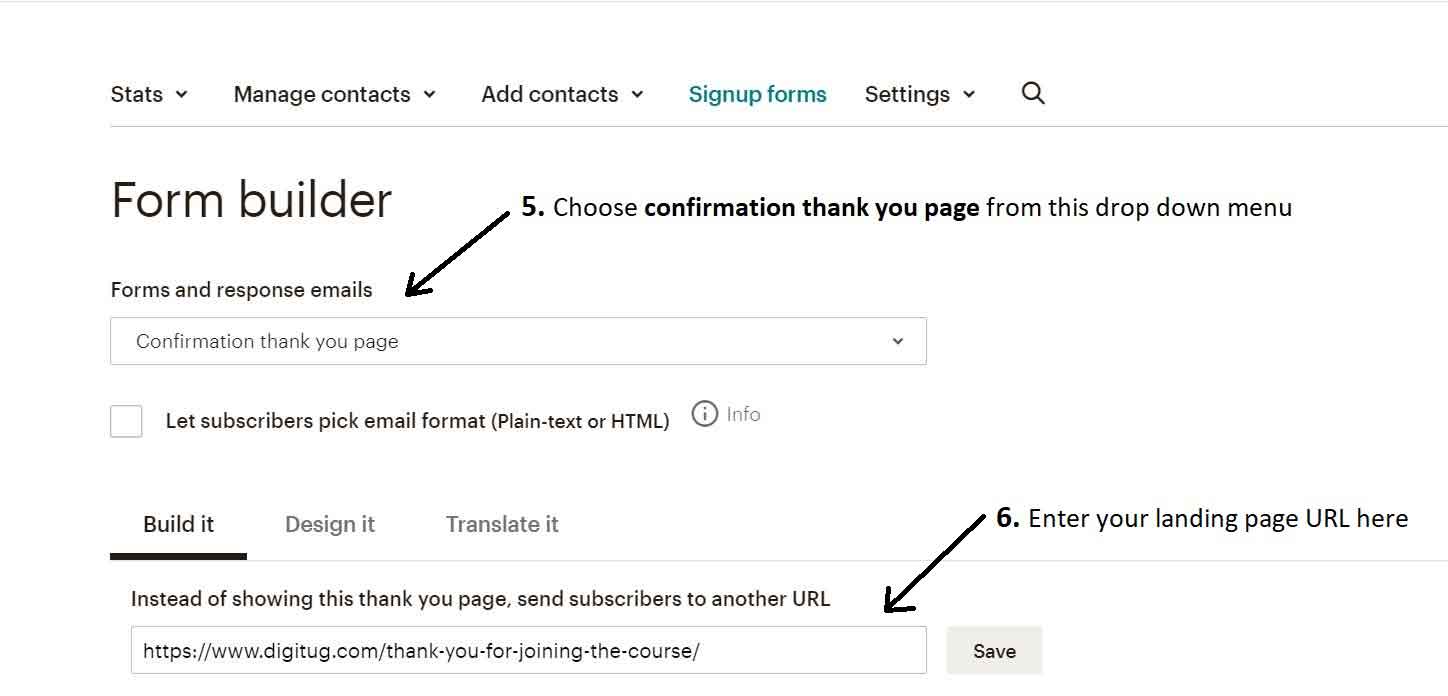
5. From the drop-down menu shown below ‘forms and response emails’ heading, choose ‘confirmation thank you page’ (see image given below)
6. See the option below which says – ‘Instead of showing this thank you page, send subscribers to another URL’ – enter the URL of your thank you page in this field and click save.
Now if everything goes well, people who click on the ‘confirm subscription’ button inside the opt-in confirmation email will be redirected to your thank you page where your freebie (free ebook) can be downloaded.
And make sure this thank you page is not indexed in any search engines. If this page is visible on search results, someone may come and download your ebook and you will end up not collecting any of their valuable email addresses.
If you make use of a plugin like Yoast SEO, you will have an option to make any page ‘no-index’ by search engines. It’s just a few clicks away, nothing complicated.
Step 6: Set up a welcome email
Honestly, you shouldn’t be ignoring a welcome email to be sent to your newly added subscribers.
You can send out an automated welcome email right after a new subscriber has been added to your list.
Ideally, they should receive this email within 5 minutes after downloading your ebook or any other freebie.
You can make use of the automation feature in your MailChimp account to get this done.
Check out these simple steps below to set up your welcome email.
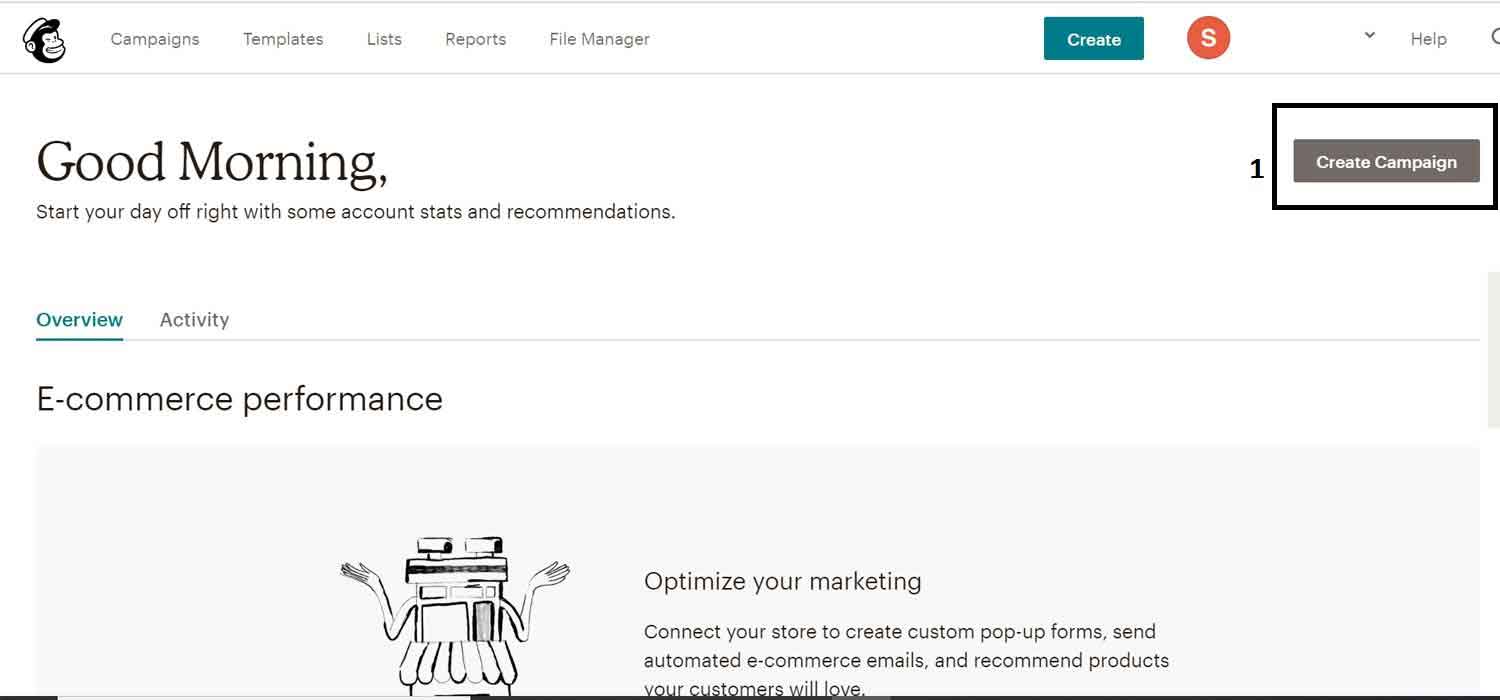
1. Login to your MailChimp account and click on ‘create campaign’.
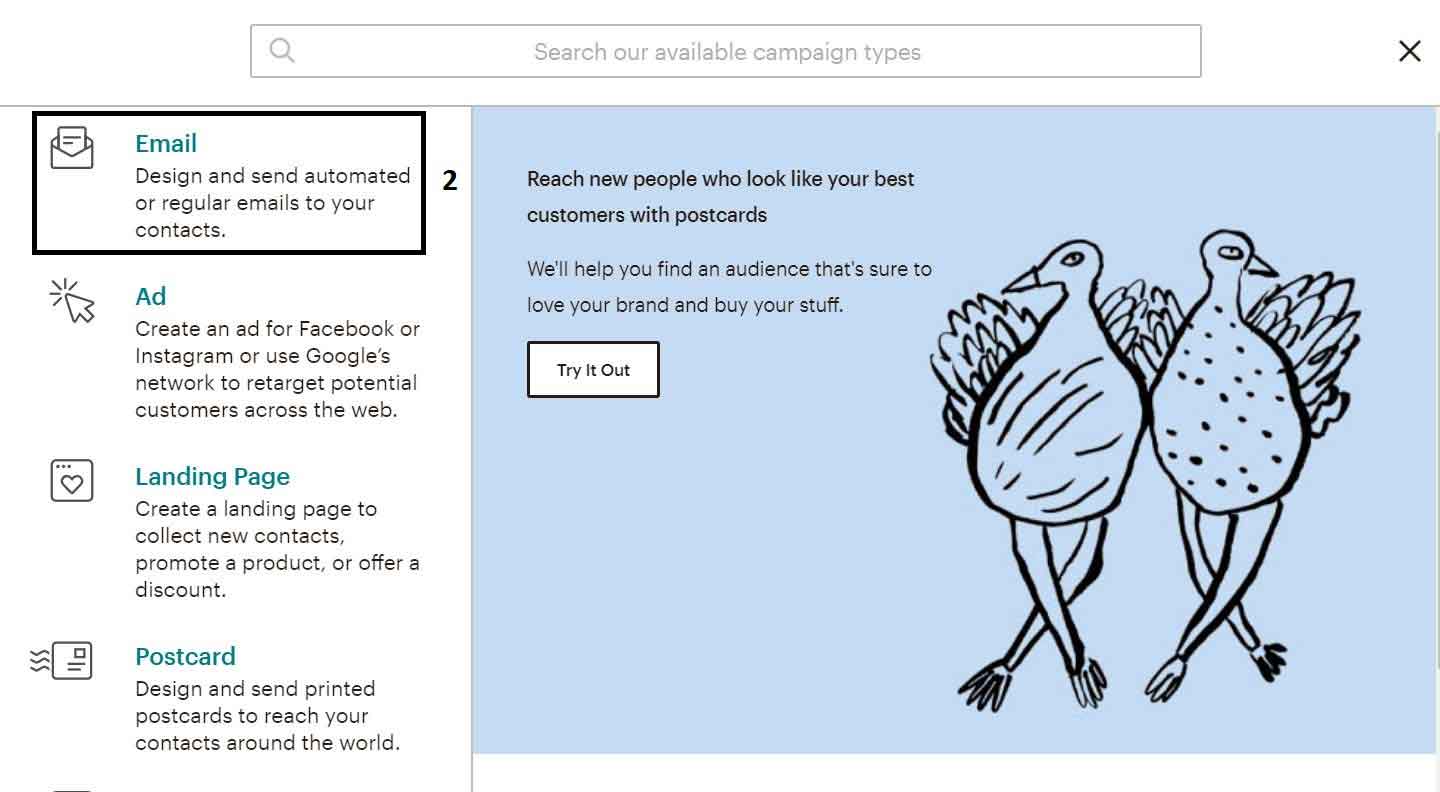
2. Choose ‘email’ from the next window that appears
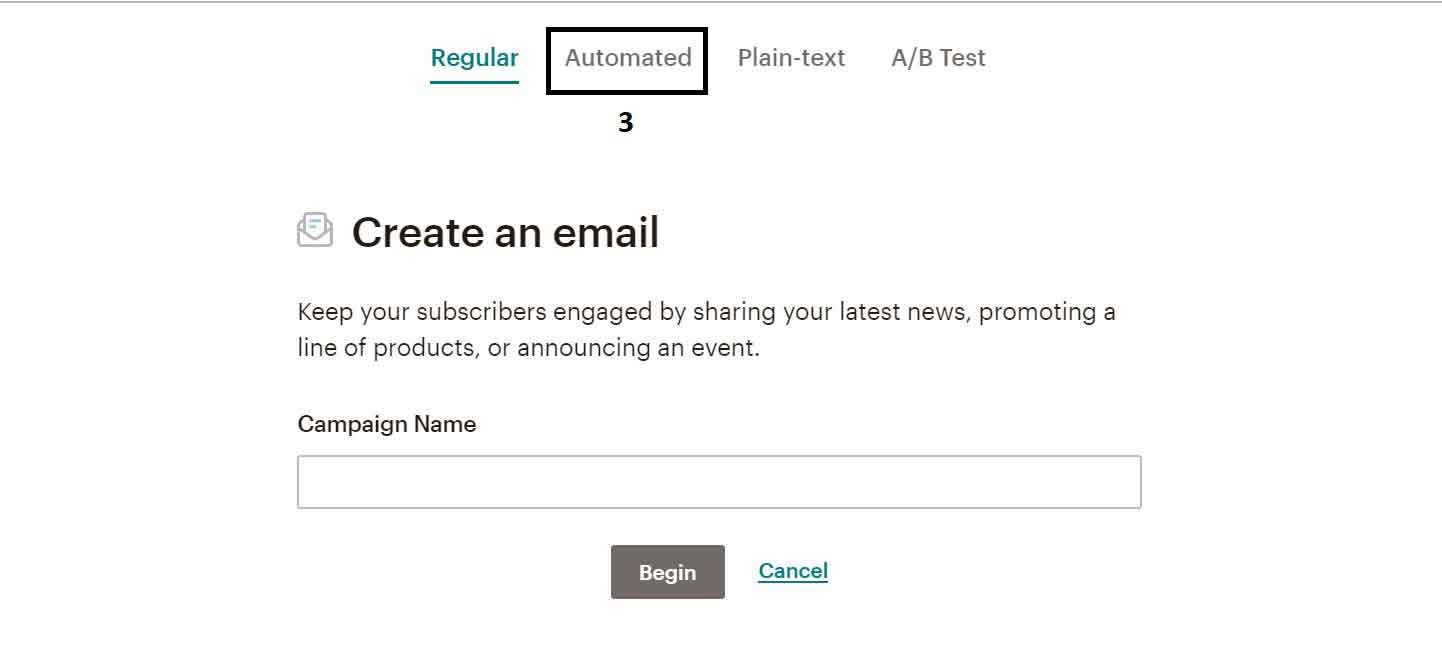
3. Click on the ‘automated’ option in the next window
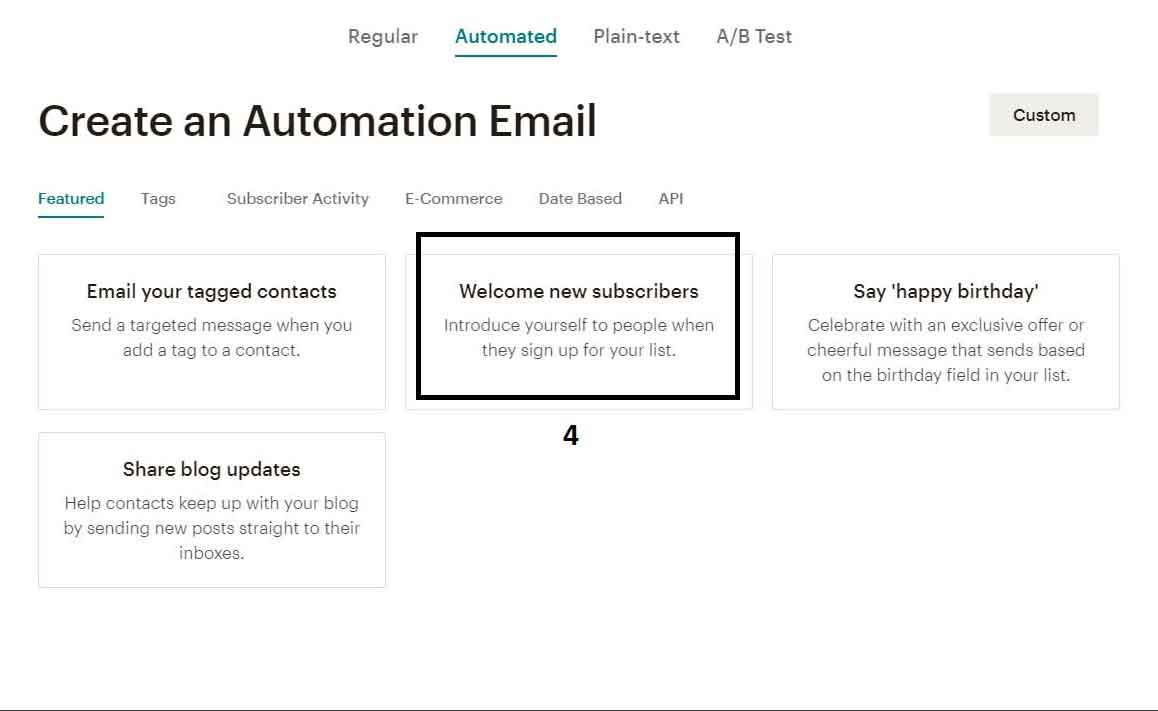
4. Choose the ‘welcome new subscribers’ option from ‘create an automation email’ window
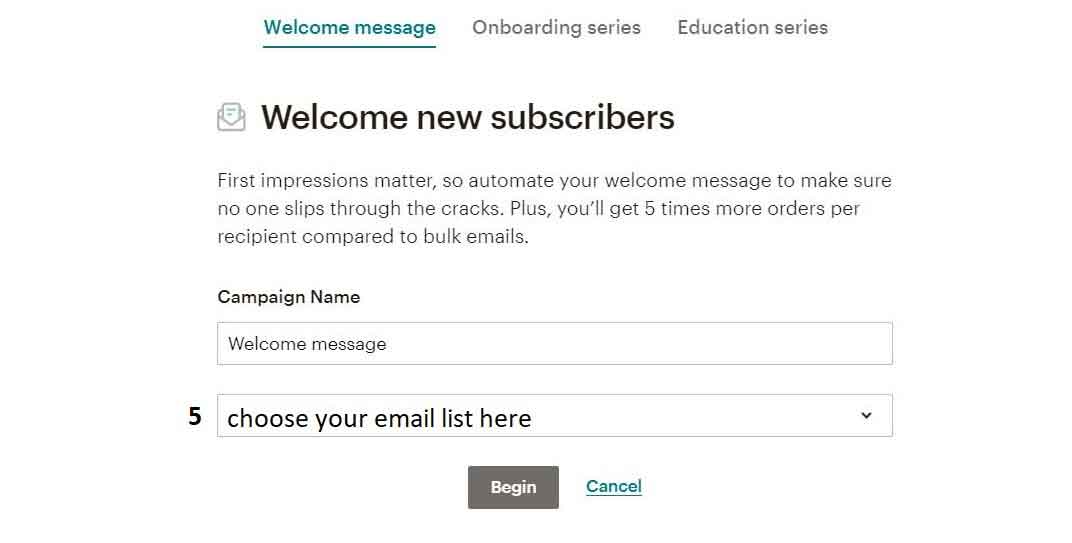
5. In this step, you can assign a name to your campaign and choose your audience or email list
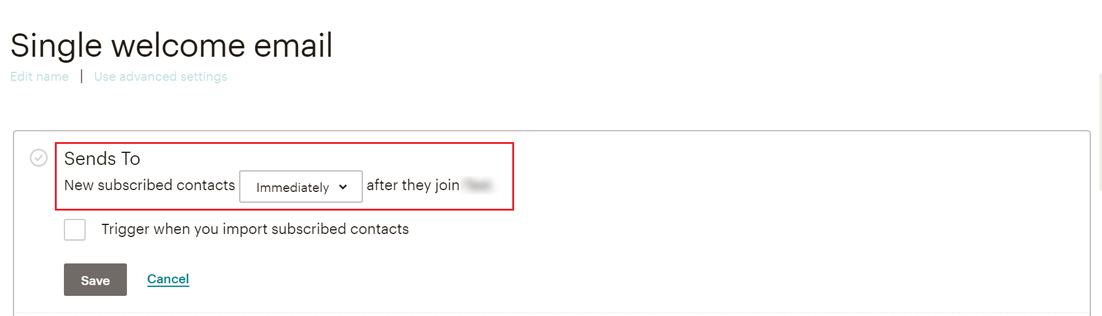
6. In this step, you can edit the trigger. This will decide when your automated email has to be sent out. Choose the option to send welcome emails to new subscribers ‘immediately’ after they join. (see below image)
Here, you can see another option to trigger the welcome email when new subscribers are imported. Enable this option if you want to send welcome emails to people that you added manually to your audience list.
I recommend not enabling this feature as it can sometimes cause confusions among your subscribers.
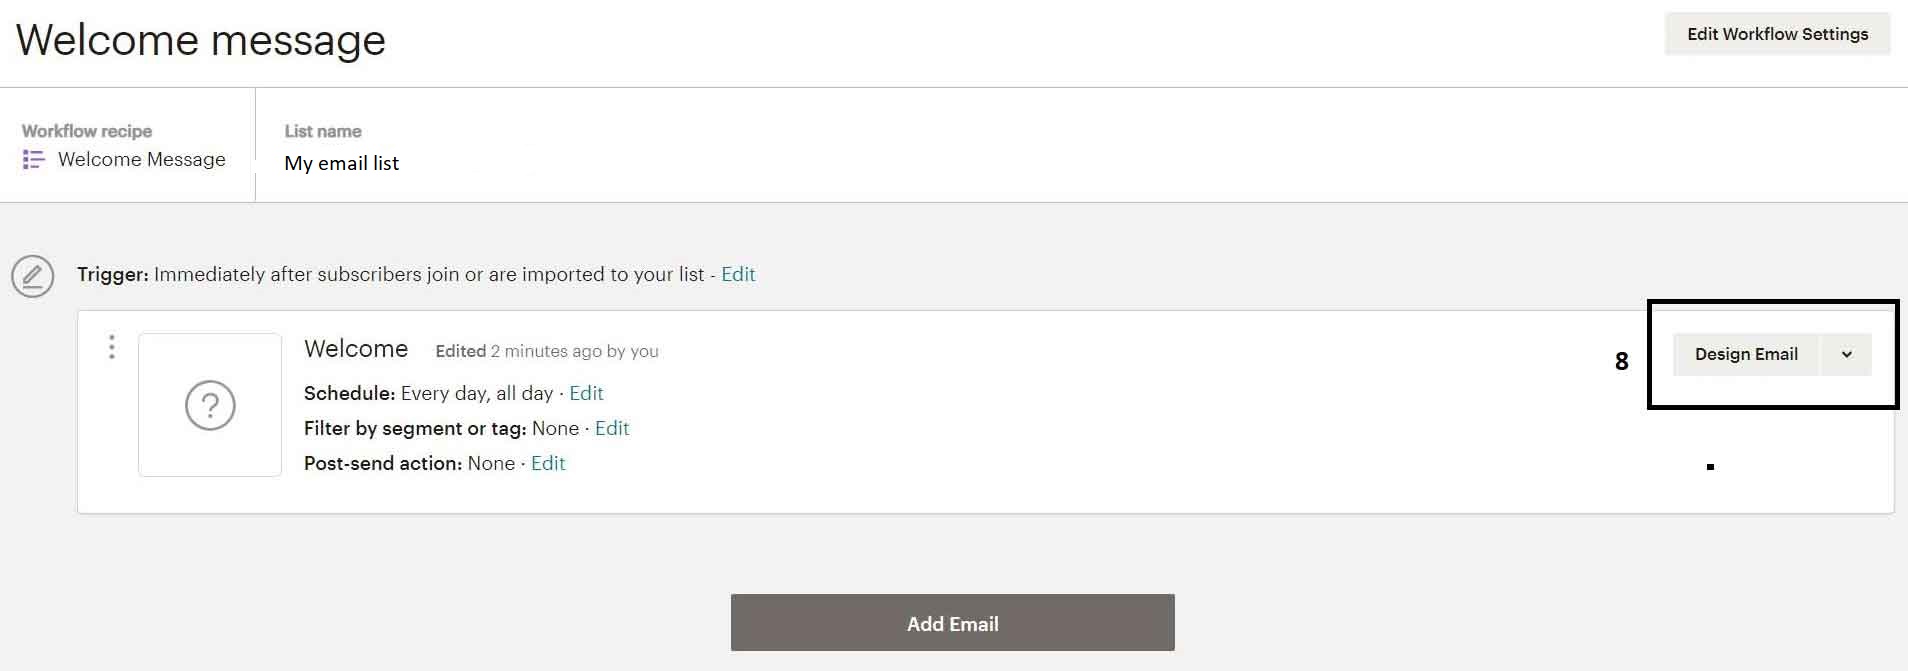
7. Once the trigger is updated, you can go ahead and design your welcome email.
In the next steps, you can decide the content of your email, complete the campaign set up and start sending your automated emails.
Importantly, make sure your welcome email content is catchy enough to get your subscribers hooked.
You can tell your subscribers about what value you are going to add them through your future email campaigns.
And remember, this is your welcome email. So don’t even think of being a little bit salesy.
Step 7: Promote your lead magnet
There are multiple ways to drive traffic to your lead magnet.
But here are a few ways that you can actually try out.
- Share your page containing the lead magnet on social media. Make use of Facebook, Twitter, LinkedIn, Instagram & Pinterest.
- Place a link to your lead magnet on the sidebar, so that it is visible to all your website visitors.
- Create a link to the lead magnet page from your homepage. You can keep one above the header using a free tool like Hello Bar. And also keep one link just above the footer.
- Talk about your lead magnet in your blog posts. Offer a contextual link to your lead magnet from your top performing blog posts.
- Run Facebook ads and drive traffic to a web page containing the lead magnet.
There are other methods as well to promote your lead magnet, but these ones are pretty quick to implement.
Step 8: Test the system
There is nothing here that falls into the ‘set it and forget it’ category.
Before your lead magnet and opt-in form goes live, you will have to test it multiple times to ensure it’s working as planned.
Keep an eye on the below-given points.
- Send emails using a custom domain
- Ensure your emails are authenticated using DKIM and SPF records
- Follow the email authentication process suggested by MailChimp
- Check how the opt-in confirmation mail is getting delivered to people who sign up (ensure it is not going to spam)
- Ensure users are getting diverted successfully to the landing page
- Make sure your freebie download is working fine
- Ensure your welcome email is catchy enough, and monitor its open rate
- Collect the first name as well along with email address. This will help you make use of name tags in your campaigns.
To wrap up
I know it’s been a lot of steps and screenshots that you just saw up there.
Hope you have got some idea about how to use MailChimp with WordPress for list building now.
If you are just starting out with your email marketing and want to build a solid list of email subscribers, this is the best tactic that you can follow.
Especially, if you are in your early stages and not really into spending a monthly amount for your email marketing tool.
The method shown in this blog post doesn’t cost you anything to set up. The tools and the plugins used are all free.
But if you want to scale up, and your list is growing at a fast pace, I would seriously suggest getting a paid email tool and form options.
Hope this helps.
Do you have any queries or feedback?
Feel free to let me know in the comments.

Theron
I’m missing a step somewhere. I have the [mc4wp_checkbox] in my Contact 7 form.
It’s inserted beautifully onto my page.
When I test it with name, email, check the box, and hit the button, I get a confirmation, but nothing is generated from Mailchimp.
I know I am missing something, just can’t figure it out.